
Take a second to consider how much sensitive information you have stored on your computer at this moment. Bank information? Family photos? Financial documents? Project files?
In some situation where you need to share your computer with others, you may want to hide those important files and folder so people don’t go nosing into your files. Fortunately, in Windows 10 you can store those files in a secret folder that is password protected.
Note: Before password protecting any document, it is advisable to create a backup of the non-password protected files in case you forget the password in the future.
In this step by step guide we will teach you how to password protect a folder in Windows 10, so you can fill it with files you want to keep secret.
Outline of this post:
- Use batch script to lock your folder with a password
- Use ZIP software to lock a folder with a password
Method 1#: How to lock your folder with a password via batch script in Windows 10
While Windows 10 doesn’t allow users to password protect a folder by default, you can use a batch script to lock folder using a password of your choice.
But just to be safe, you should first try this with the files that you can afford to lose, just in case the method doesn’t work for you. Then let’s begin the process:
Step 1: Start by navigating to the folder you would like to lock. You will create a new folder on our desktop to use for this demonstration named as “Secure Folder.”


Step 2: Right click inside the folder, select “New” from the contextual menu. Click on “Text Document.”


Step 3: You can name this text file anything such as “Pass”, “Secret” or “Code” because you can delete this text file once the lockable folder has been made. Within this document, copy and paste the following code:
cls

@ECHO OFF
title Secure Folder
if EXIST "Control Panel.{21EC2020-3AEA-1069-A2DD-08002B30309D}" goto UNLOCK
if NOT EXIST Locker goto MDLOCKER

:CONFIRM

echo Are you sure u want to Lock the folder(Y/N)
set/p "cho=>"
if %cho%==Y goto LOCK
if %cho%==y goto LOCK
if %cho%==n goto END
if %cho%==N goto END
echo Invalid choice.
goto CONFIRM


:LOCK

ren Locker "Control Panel.{21EC2020-3AEA-1069-A2DD-08002B30309D}"
attrib +h +s "Control Panel.{21EC2020-3AEA-1069-A2DD-08002B30309D}"
echo Folder locked
goto End


:UNLOCK

echo Enter password to Unlock folder
set/p "pass=>"
if NOT %pass%==Enter-Your-Password goto FAIL
attrib -h -s "Control Panel.{21EC2020-3AEA-1069-A2DD-08002B30309D}"
ren "Control Panel.{21EC2020-3AEA-1069-A2DD-08002B30309D}" Locker
echo Folder Unlocked successfully
goto End


:FAIL

echo Invalid password
goto end


:MDLOCKER

md Locker
echo Locker created successfully
goto End

:End
To set your password, change the text string “Enter-Your-Password” into “demo@123” or any desired password of your choice.
Also, make sure you are keeping some record of the exact password you are using to lock your folder. If you lose the password, your files are gone.


Step 4: Once you have added your password, head to “File” >> “Save As” and name it “Secret.bat”. You can give any name to your file but make sure you add .bat extension to your file.


It is also important to select “Save as type” as “All Files”. It provides you an opportunity to change the default Notepad document extension (Secret.txt to Secret.bat).
If you are not selecting the option “All Files“, then your end result would be Secret.txt.bat which is a normal text document rather than a batch file.
Step 5: Double click the Secret.bat file to create your “Locker” folder then fill the “Locker” folder with documents you want to protect.


Step 6: This is the folder which will be locked with your password. Double click on “Secret.bat” batch file again and type “Y” on command prompt.


Once you hit “Enter”, Secure folder command prompt window will disappear, along with the Locker folder itself. All secret files are now safe.
Step 7: To unlock the folder, double click on “Secret.bat” batch file and type your password (in this case – demo@123) on command prompt.

Hit “Enter” on command prompt to reveal your “Locker” folder where you can find your hidden files.
Also, remember this script can be reverse engineered by someone who understands the process, but this isn’t meant to keep tech-savvy folks out, just nosy family members who you do not trust.
Method 2#: How to lock a folder in Windows 10 with the help of a ZIP software such as WinRAR
In our first method we had used Notepad program to create a batch file and then safeguard the folder. In this method we will use a ZIP software such as WinRAR to protect our folder with password. You can use any ZIP software available on the market like WinZip, 7-Zip of your choice.
WinRAR is typically used to unzip folders and extract files but it also allows users to password protect their folders. Here are the step by step process to password protect your folder.
Step 1: Download and Install WinRAR.
Step 2: Go back to your “Secure Folder” where you have all files which you want to password protect. Right click on the folder and select “Add to archive…” from the contextual menu.

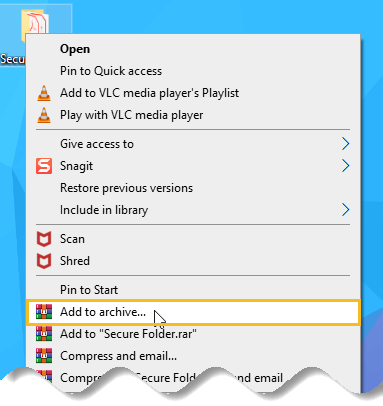
Step 3: A new window will pop-up where select “RAR” as archive format. Enter your desired password. Click on “Encrypt file names” checkbox. Hit “OK” button twice and you are done.


Step 4: Your files are now safe. To test out double click on “Secure Folder” and a window pop-up which ask for password to unlock.


Bonus tip : Change of a file extension for extra protection
This is a bonus tip in conjunction with ZIP software which make you astonished that you did not know before. This is an extra step which you can skip. For extra protection of your data we recommends to complete this step.
Step 5: Right click on the archive and change the file extension from .rar to something else. Again try avoiding popular extensions and name the file something technical such as .abc .


If you can’t see the .rar extension, you need to enable the setting.
Use keyboard shortcut + E. Go to “View” tab and click on “File name extensions” checkbox. It’s wise to turn this option ON again to confuse someone further.


Conclusion
The above two methods are the easiest one to protect your files and folder by password. But there is no such thing as a 100% protected file or folder .
However, the protection methods listed above will protect your files and folder from the majority of users. If you are working with really sensitive data, we suggest a commercial product for protecting your files and data.

