When you store sensitive data on your laptop, it’s crucial that you take the necessary steps to protect that data. This is especially true for corporate business people who travel frequently with important documents with them. It’s more about preventing your corporate private data from falling into the wrong hands.
The way you can protect your data is by using encryption. It is a method of making readable information unrecognizable to unauthorized users. When you encrypt your information, it remains usable even when you share it with other users.
In other words, only you with the right encryption key can make the data readable again. BitLocker is a tool built into Windows 10 that lets you encrypt an entire hard drive or a removable device such as an USB flash drive to prevent prying eyes from snooping into your sensitive data.
Also Read: How to use VeraCrypt to encrypt an USB flash drive
In this step by step guide, we will walk you through the steps to set up BitLocker on Windows 10 PC to make sure your sensitive data stays secure.
Outline of this post:
- What is BitLocker?
- BitLocker system requirements
- Check if your Windows 10 PC has a TPM chip
- Check if your computer has TPM hardware that is disabled
- How to turn on BitLocker without TPM
- Setup BitLocker on Windows 10
Important: While BitLocker is a stable feature on Windows 10, as any significant change you make to your computer has its own risks. It’s always recommended that you make a backup of your system before proceeding with this guide.
What is BitLocker?
BitLocker is Microsoft’s easy-to-use, proprietary encryption program for Windows that can encrypt your entire drive as well as help protect against unauthorized changes to your system.
What are the minimum system requirements for BitLocker
- BitLocker drive encryption is available only on Windows 10 Pro and Windows 10 Enterprise.
- For best results your computer must be equipped with a Trusted Platform Module (TPM) chip.
- A storage drive with at least two partitions.
- Additionally, the hard drive partitions must be formatted with the NTFS file system.
“TPM is a special microchip that enables your device to support advanced security features. You can use BitLocker without a TPM chip by using software-based encryption.”
TPM (Trusted Platform Module) is normally soldered to the motherboard on most new PCs. It provides tamper resistant way to store encryption keys on Windows 10 PC. Here is how to check whether your Windows 10 PC has a TPM chip or it is absent on your computer’s motherboard.
How to check if your Windows 10 PC has a TPM chip
Method #1: By using device manager
Step 1: Press + R to open the Run dialog window. Type devmgmt.msc into it and click OK.
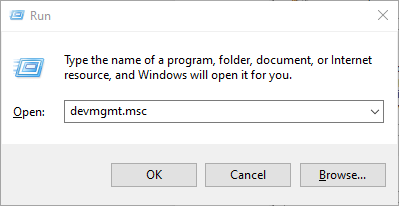
Step 2: This opens Device Manager. Expand Security devices. If you have a TPM chip, one of the items should read Trusted Platform Module with the version number.

Method #2: By using TPM management tool
Step 1: Press + R to open the Run dialog window. Type tpm.msc into it and click OK.
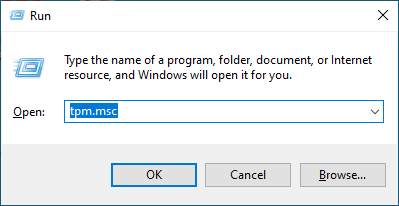
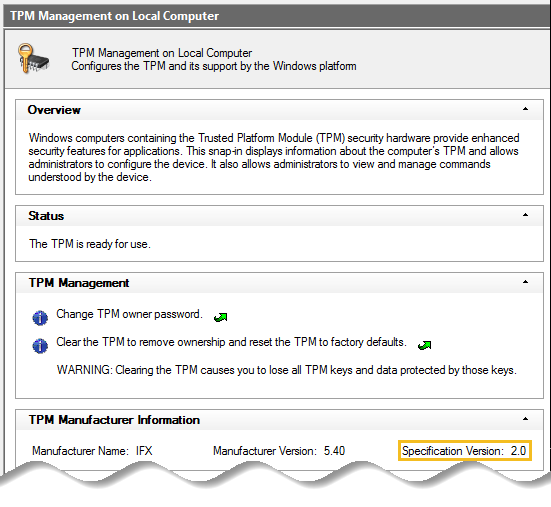
Step 2: This opens the built in utility – Trusted Platform Module (TPM) Management. If you see a message at the bottom right corner of the window informing you which TPM specification version your chip supports then your PC does have a TPM.
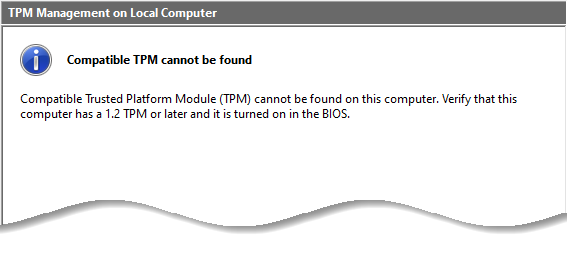
If you see a “Compatible TPM cannot be found” message instead, your Windows 10 PC does not have a TPM or it’s turned off in the BIOS/UEFI.
How to check if your computer has TPM hardware that is disabled
If you are unable to find any TPM on your Windows 10 PC using the above methods, it’s possible that the TPM is disabled in the BIOS/UEFI firmware. Here are the instructions to check:
Step 1: Restart your Windows 10 PC. Press the hotkey usually F2 or Delete to enter the BIOS.
Step 2: Once in the BIOS, locate the section that configures Security. In the Security section, locate the TPM option.
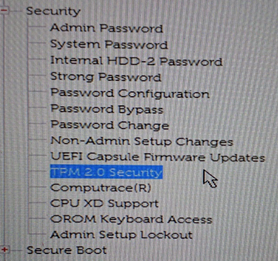
If there is no such setting, your computer probably doesn’t have TPM chip.


Add comment