
“Site Kit” is a WordPress plugin developed by Google. It is no secret that the integration between Google and WordPress has always been great. Google Site Kit for WordPress helps you to connect Google services such as Google Analytics and Search Console to your WordPress website.
Website owners can use Google Site Kit to monitor, analyze, and improve website performance effectively. The best thing about this plugin? It’s totally free.
In this tutorial, we will show you how to set up Google Site Kit in your website and connect the three most popular Google services to your WordPress dashboard – i.e. Google Search Console, Google Analytics and PageSpeed Insights.
Outline of this post:
- Install Google Site Kit on your WordPress website
- Configure Google Site Kit on your WordPress website
- Configure Google Analytics on your WordPress website
- Configure PageSpeed Insights on your WordPress website
- Troubleshooting Google Site Kit for WordPress
- Disconnect Google Site Kit from your WordPress website (Tip)
- Final thoughts
How to install Google Site Kit on your WordPress website
Step 1: Google Site Kit is available to download right here, download the .zip file to your computer.

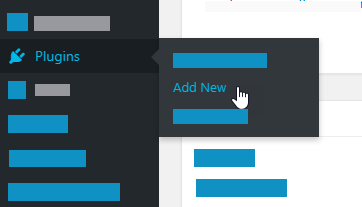
Step 2: Once downloaded, login to your WordPress dashboard and go to Plugins -> Add New
Step 3: On top of the page, click “Upload Plugin” button and then click on “Choose File”.

Step 4: Select “google-site-kit.zip” file from your computer, Click “Install Now” button. Wait for a few seconds for WordPress to complete the installation.

Step 5: Click on “Activate Plugin” button.

Once done, you should see a screen like the one below.

How to configure Google Site Kit on your WordPress website
In this step, we will configure the Google Site Kit plugin in WordPress. Think of this step as building a highway between your WordPress website and Google’s services. Once you build the highway, you can connect Google Site Kit to all supported Google’s services such as Search Console and Analytics.
Step 1: Once Google Site Kit is active on your website, click the “Start Setup” button to integrate Google’s services within your WordPress website.

Step 2: Go to developers.google.com/web/sitekit and generate your client ID.

Warning: Due to some restrictions on Google’s end, you need to disable your ad-blocker (if any) for the remainder of this tutorial.
Step 3: You will be redirected to a new window with the information about your website. Click on the “Get Oauth Credentials” button.

Step 4: A popup showing the “Terms of Service” agreement will display. Select “Yes” and click “Next”. You can also enter a unique project name or leave as it is pre-populated from last step.

Step 5: Copy your OAuth Credentials and click the “Done” button.

Step 6: Go back to your WordPress dashboard and paste the code in the Client Configuration text area. Click “Proceed”.

Step 7: The next step is to authenticate your Google account. Click the “Sign in with Google” button and authenticate your WordPress website with Google.

Step 8: Log in to your Google account to complete the authentication process.

Step 9: Confirm that Google has following access privileges to your WordPress website and then click the “Allow” button.

Step 12: Finally, you have successfully configured Google Site Kit and connected to Google Search Console with your WordPress website. Google Search Console is a great tool for analyzing website performance in Google Search. It reports the status of indexing, traffic, and other significant SEO metrics.

Now click the “Go to Dashboard” button to connect your website to the other three recommended services from Google.
How to configure Google Analytics on your WordPress website using Google Site Kit
Google Analytics allows website owner to implement a tracking code on specific web pages, which alerts Google when the site is being visited. This allows the website owner to be able to utilize this data and learn more about the audience of people who are actually visiting the website, to further their SEO strategy.
In this section, we will show you how to view Google Analytics data to your WordPress dashboard using Google Site Kit.
Step 1: To connect to Google Analytics, simply click on its corresponding “Connect Service” link.

Step 2: Click on “Proceed” to go to the next step.

This screen basically tells you that you will get an “Unverified App” warning when you try to login with your Google account. There is no need to worry about it as there are no known security issues in the Google Site Kit plugin.
Step 3: Select your primary Google account that has access to Google Analytics. Ideally, this should be the same Google account that you used in the Search Console configuration.

Step 4: This is the warning message we talked about earlier. Click on “Advanced” link. Click “Go to hello-sunil.in (unsafe)” link as shown in the screenshot below.

Step 5: Grant all the permissions required by Google Site Kit to use access your Google Analytics account. Click on “Allow” to proceed to the next step.

Step 6: Google Site Kit will now return to the WordPress dashboard. Click on “Configure Analytics” to proceed to the final step.

Google Analytics is now successfully linked to your WordPress website using Google Site Kit. Well done!
How to configure PageSpeed Insights on your WordPress website using Google Site Kit
PageSpeed Insights is a popular Google tool which helps webmasters to optimize their websites to load more quickly on the visitors’ device. To get this information on your WordPress dashboard then follow these steps:
Step 1: To connect to PageSpeed Insights, simply click on its corresponding “Connect Service” link.

Step 2: Click the developers.google.com/web/sitekit/apikey link and generate your API Key.

Step 3: Click on the “Get API Key” button.

Step 4: Copy your API key and click the “Done” button.

Step 5: Go back to your WordPress dashboard, paste the code, and click “Proceed”.

And, that’s it! You are now connected to PageSpeed Insights.
How to troubleshoot Google Site Kit for WordPress
Sometimes Google Site Kit might show a warning message such as “Issue Accessing Data” in your WordPress dashboard as shown below.

In this case, you would need to re-authenticate your Google account once again by clicking on “Click here” button.
Tip: How to disconnect Google Site Kit from your WordPress website
If you want to disconnect Google Site Kit from your WordPress website, click on your email ID, and then click “Disconnect”.

Similarly, if you want to disconnect an individual service, go to that service and click “Edit”. Click on edit for disconnecting an individual service from google site kit.

Next, disconnect the service from Google Site Kit.

Conclusion
Once you are done, Google will begin to discover and render your pages in Search Console, display how users are navigating across your sites via Google Analytics and see how your pages perform compared to other real world with PageSpeed Insights.
Google Site Kit is indeed revolutionary. The convenience of having these analytical tools in one plugin allows users to actually utilize all the resources at once, meaning they to ensure a well rounded and coherent SEO strategy.
What do you think about Google Site Kit? Would you use it on your WordPress website? Let us know your thoughts in the comments below!


Add comment