
Looking to learn what canonical tags are, and how to use them to avoid dreaded duplicate content issues?
Understanding canonical URLs is essential in SEO and properly setting up your canonical tags is a SEO best practice and an important task in website content management.
Below we will explain exactly what canonical tags are, why you need them, and the best practices to follow when adding them to your site.
Let’s dive in.
What is a canonical tag?
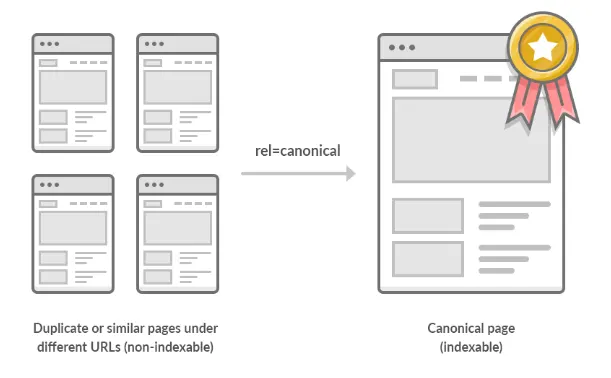
A canonical tag (rel=“canonical”) is a snippet of HTML code that defines the main version for duplicate, near-duplicate and similar pages.
A canonical tag serves a single purpose. It tells search engines which URL on your website represents the “master” version of the page
In other words, if you have the same or similar content available under different URLs, you can use canonical tags to specify which version is the main one and thus, should be indexed.
Source: ahrefs
What does a canonical tag look like?
Canonical tags use simple and consistent syntax, and are placed within the <head> section of a web page:
<link rel=“canonical” href=“https://example.com/sample-page/” />
Here’s what each part of that code means:
link rel=“canonical”: The link in this tag is the master (canonical) version of this page.
href=“https://example.com/sample-page/”: The canonical version can be found at this URL.
A canonical URL can be seen in the source of a webpage, by searching for rel="canonical". It is an element only the search engines see, your users won’t be affected by it.

But I don’t have duplicate content, do I?
Given that you probably haven’t been publishing the same posts and pages multiple times, it’s easy to assume that your website has no duplicate content.
But search engines crawl URLs, not web pages.
That means that they see:
example.com/product
example.com/product?color=red
As unique pages, even though they are the same web page with identical or similar content.
These are called parameterized URLs, and they are a common cause of duplicate content, especially on ecommerce sites.
For example, XYZ sells shirts. This is the URL for their main category page:
https://www.bbclothing.co.uk/en-gb/clothing/shirts.htmlIf you filter for only XL shirts, a parameter is added to the URL:
https://www.bbclothing.co.uk/en-gb/clothing/shirts.html?Size=XLIf you then also filter for only blue shirts, yet another parameter is added:
https://www.bbclothing.co.uk/en-gb/clothing/shirts.html?Size=XL&color=BlueThese are all separate pages in Google’s eyes, even though the content is only marginally different.
But it’s not just ecommerce sites that fall victim to duplicate content.
Here are some other common causes of duplicate content that apply to all types of websites:
Having parameterized URLs for search parameters:
Example: example.com?q=search-term
Having parameterized URLs for session IDs:
Example: https://example.com?sessionid=3
Having separate printable versions of pages:
Example: example.com/page and example.com/print/page
Having unique URLs for posts under different categories:
Example: example.com/services/SEO/ and example.com/specials/SEO/
Having pages for different device types:
Example: example.com and m.example.com
Having AMP and non-AMP versions of a page:
Example: example.com/page and amp.example/page
Serving the same content at non-www and www variants:
Example: http://www.example.com and https://www.example.com
Serving the same content with and without trailing slashes:
Example: https://example.com/page/ and http://www.example.com/page
Serving the same content at default versions of the page such as index pages:
Example:
https://www.example.com/
https://www.example.com/index.htm
https://www.example.com/index.html
https://www.example.com/index.php
https://www.example.com/default.htm
Serving the same content with and without capital letters:
Example: https://example.com/page/ and http://www.example.com/Page/
In these situations, the proper use of canonical tags is crucial.
The SEO benefit of rel=canonical
As we mentioned above, duplicate content can be a big problem for SEO. When search engines find two (or more) very similar pages, they don’t know which one to add to the search results. As a result, all of those pages might end up ranking lower.
You might, for instance, have a post or product that is attached to two categories and exists under two URLs, like so:
https://example.com/black-shoes/black-and-red-shoes/
https://example.com/red-shoes/black-and-red-shoes/
If these URLs are both for the same product, setting one as the canonical URL tells search engines which one to show in the search results.
You can also use canonicals to point search engines to the original version of an article.
For instance if you have written a guest post for another website. If you want to post it on your site too, you could agree to post it with a canonical link to the original version.
The Basics of Canonical Tag Implementation
There are five golden rules that you should remember at all times while dealing with canonicals.
Rule #1: Use absolute URLs
So you should use the following structure:
<link rel=“canonical” href=“https://example.com/sample-page/” />As opposed to this one:
<link rel=“canonical” href=”/sample-page/” />Rule #2: Use lowercase URLs
Since Google may treat uppercase and lowercase URLs as two different URLs so always use lowercase URLs for your canonical tags.
Rule #3: Use the correct domain version (HTTPS vs. HTTP)
If you are on a secure domain, ensure that you use the following version of your URL:
<link rel=“canonical” href=“https://example.com/sample-page/” />As opposed to:
<link rel=“canonical” href=“http://example.com/sample-page/” />Rule #4: Use one canonical tag per page
If the page has multiple canonical tags, then Google will ignore both.
Rule #5: Use self-referential canonical tags
In case you are unsure how a self-referential canonical works, it’s basically a canonical tag on a page that points to itself.
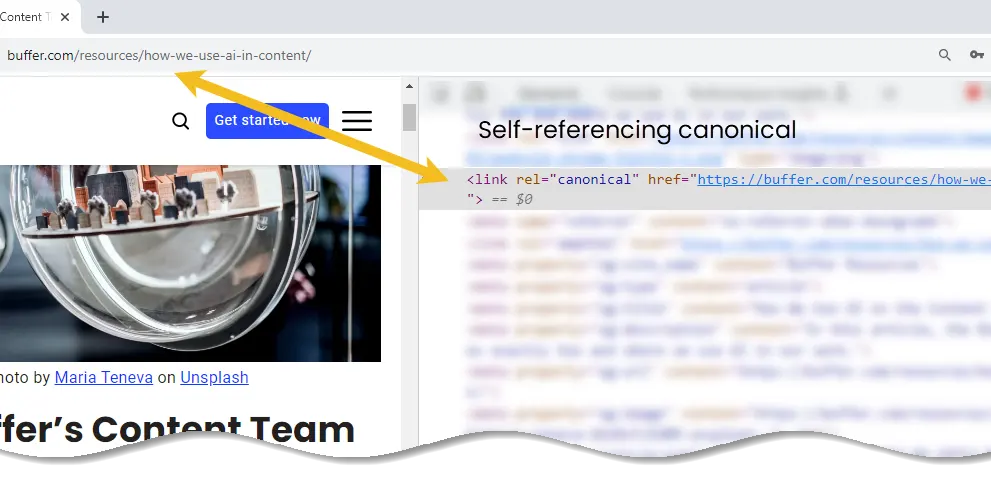
For example, if the URL were https://example.com/sample-page, then a self-referencing canonical on that page would be:
<link rel=“canonical” href=“https://example.com/sample-page” />How to Implement Canonicals
There are four known ways to specify canonical URLs. These are what are known as canonicalization signals:
- HTML tag (rel=canonical)
- HTTP header
- Sitemap
- 301 redirect
For pros and cons of each method, see Google’s official documentation.
Setting canonicals using rel=“canonical” HTML tags
Using a rel=canonical tag is the simplest and most obvious way to specify a canonical URL.
Simply add the following code to the section of any duplicate page:
<link rel=“canonical” href=“https://example.com/canonical-page/” />Let’s say that you have an ecommerce website selling t-shirts. You want https://yourstore.com/tshirts/black-tshirts/ to be the canonical URL, even though that page’s content is accessible via other URLs (e.g., https://yourstore.com/offers/black-tshirts/).
Simply add the following canonical tag to any duplicate pages:
<link rel=“canonical” href=“https://yourstore.com/tshirts/black-tshirts/” />Note that if you are using a CMS, you don’t need to mess around with the code of your page. There’s an easier way.
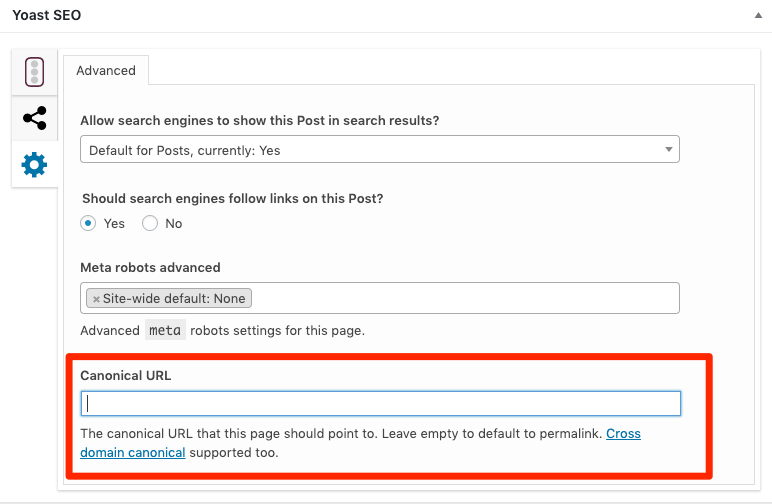
Setting canonical tags in WordPress:
Install Yoast SEO and self-referencing canonical tags will be added automatically. To set custom canonicals, use the “Advanced” section on each post or page.
Setting canonicals in HTTP headers
For documents like PDFs, there’s no way to place canonical tags in the page header because there is no page <head> section. In such cases, you will need to use HTTP headers to set canonicals. You can also use a canonical in HTTP headers on standard webpages.
Imagine that we create a PDF version of this blog post and host it in our blog subfolder (hello-sunil.in/blog/*).
Here’s what our HTTP header might look like for that file:
HTTP/1.1 200 OK
Content-Type: application/pdf
Link: <https://hello-sunil.in/blog/canonical-tags/>; rel="canonical"
Setting canonicals in sitemaps
Google states that non-canonical pages shouldn’t be included in sitemaps. Only canonical URLs should be listed. That’s because Google sees the pages listed in a sitemap as suggested canonicals. However, they won’t always select URLs in sitemaps as canonicals.
Setting canonicals with 301 redirects
Use 301 redirects when you want to divert traffic away from a duplicate URL and to the canonical version.
Lets see an example:
Suppose your page is reachable at these URLs:
- example.com
- example.com/index.php
- example.com/home/
Choose one URL as the canonical and redirect the other URLs there.
You should do the same for secure HTTPS/HTTP and www/non-www versions of your site. Choose one canonical version and redirect the others to that version.
For example, the canonical version of ahrefs.com is the HTTPS non-www URL (https://hello-sunil.in). All of the following URLs redirect there:
- http://hello-sunil.in/
- http://www.hello-sunil.in/
- https://www.hello-sunil.in/
Common Canonicalization Mistakes to Avoid
Here are some common mistakes to avoid
Mistake #1: Blocking the canonicalized URL via robots.txt
Blocking a URL in robots.txt prevents Google from crawling it, meaning that they are unable to see any canonical tags on that page. That, in turn, prevents them from transferring any “link equity” from the non-canonical to the canonical.
Also Read: Robots.txt and SEO: Everything You Need to Know
Mistake #2: Setting the canonicalized URL to ‘noindex’
Never mix noindex and rel=canonical. They are contradictory instructions.
Google will usually prioritize the canonical tag over the noindex tag but it’s still bad practice. If you want to noindex and canonicalize a URL, use a 301 redirect. Otherwise, use rel=canonical.
Mistake #3: Setting a 4XX HTTP status code for the canonicalized URL
Setting a 4XX HTTP status code for a canonicalized URL has the same effect as using the noindex tag: Google will be unable to see the canonical tag and transfer link equity to the canonical version.
Mistake #4: Canonicalizing all paginated pages to the root page
Paginated pages should not be canonicalized to the first paginated page in the series. Instead, self-referencing canonicals should be used on all paginated pages.
You should also use rel=prev/next tags for pagination. These are no longer used by Google, but Bing still uses them.
Mistake #5: Not using canonical tags with hreflang
Hreflang tags are used to specify the language and geographical targeting of a webpage.
Google states that when using hreflang, you should “specify a canonical page in the same language, or the best possible substitute language if a canonical doesn’t exist for the same language.”
Mistake #6: Having multiple rel=canonical tags
Having multiple rel=canonical tags will cause them to likely be ignored by Google. In many cases this happens because tags are inserted into a system at different points such as by the CMS, the theme, and plugin(s).
This is why many plugins have an overwrite option meant to make sure that they are the only source for canonical tags.
Another area where this might be a problem is with canonicals added with JavaScript. If you have no canonical URL specified in the HTML response and then add a rel=canonical tag with JavaScript then it should be respected when Google renders the page.
However, if you have a canonical specified in HTML and swap the preferred version with JavaScript, you are sending mixed signals to Google.
Mistake #7: Rel=canonical in the <body>
rel=canonical should only appear in the <head> of a document. A canonical tag in the <body> section of a page will be ignored.
How to Audit Canonical Tags on Your Site
Find out what Google considers to be the canonical URL for any page on your website with Google Search Console.
After logging in, search for a URL at the top.
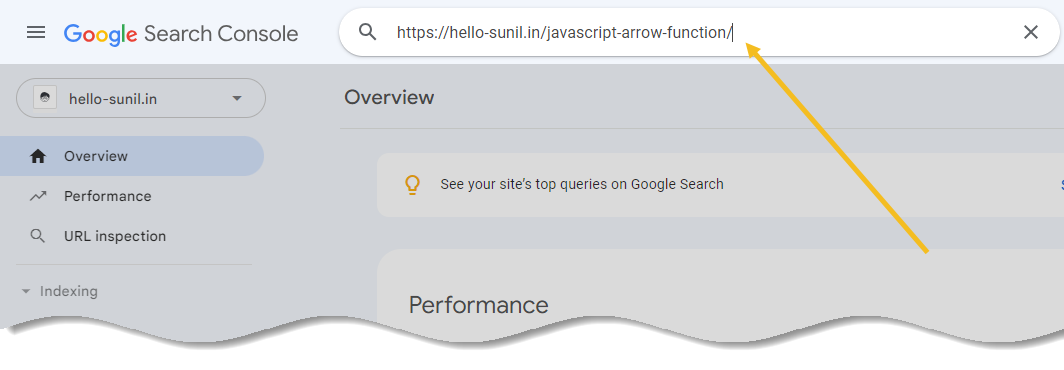
When the URL Inspection report is ready, open the Page indexing section.
Scroll down to see the Google-selected canonical.
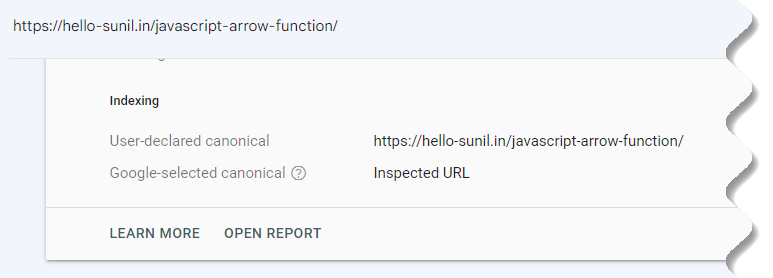
If this isn’t your preferred URL, you may need to review the deduplication strategy on your page.
To start, make sure that the User-declared canonical is present and correct.
To audit your site’s canonical tags at scale, use Screaming Frog tool.
How To Use Screaming Frog To Uncover Duplicate Content
By Screaming Frog SEO Spider can be use to find both exact duplicate content, and near-duplicate content where some text matches between pages on a website.
Steps to follow:
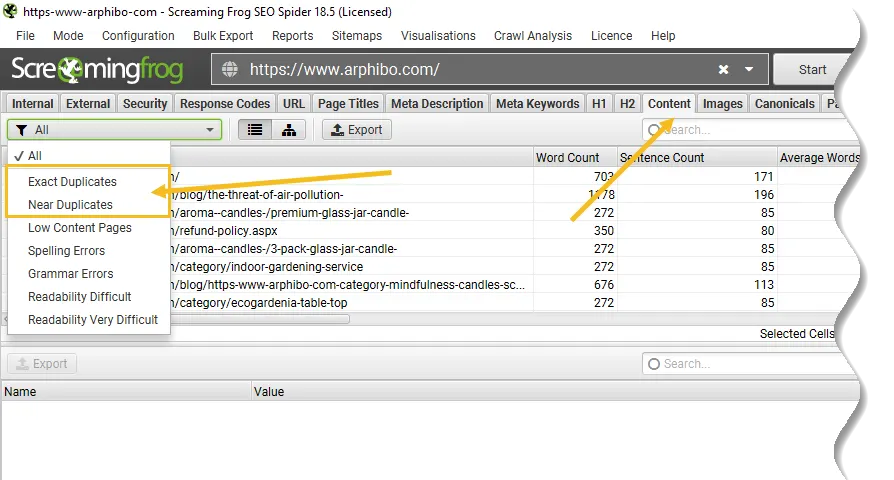
Step 1: Enable Near Duplicates
By default Screaming Frog SEO Spider will automatically identify exact duplicate pages. However, to identify Near Duplicates the configuration must be enabled, which allows it to store the content of each page.
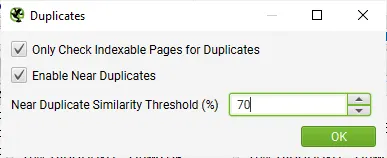
Enable Near Duplicates Via Config > Content > Duplicates
The Screaming Frog SEO Spider will identify near duplicates with a 90% similarity match, which can be adjusted to find content with a lower similarity threshold.
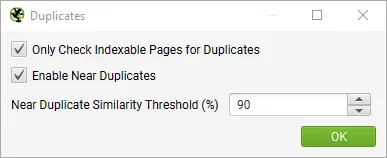
Screaming Frog SEO Spider will also only check Indexable pages for duplicates (for both exact and near-duplicates).
This means if you have two URLs that are the same, but one is canonicalised to the other (and therefore ‘non-indexable’), this won’t be reported – unless this option is disabled.
If you are interested in finding crawl budget issues, then untick the Only Check Indexable Pages For Duplicates option, as this can help find areas of potential crawl waste.
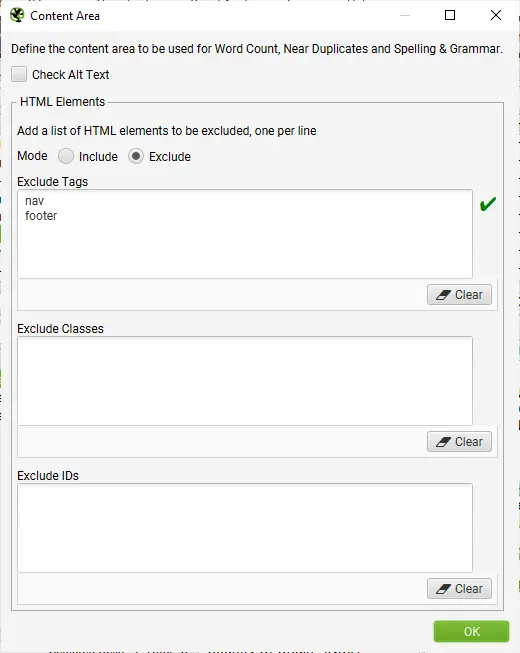
Step 2: Adjust Content Area
You are able to configure the content used for near-duplicate analysis. For a new crawl, we recommend using the default set-up and refining it later when the content used in the analysis can be seen, and considered.
Screaming Frog SEO Spider will automatically exclude both the nav and footer elements to focus on main body content. However you are able to refine the content area used for the analysis if required. You can choose to ‘include’ or ‘exclude’ HTML tags, classes and IDs in the analysis.
Adjust Content Area For Analysis Via Config > Content > Area
Step 3: Crawl The Website
Open up the Screaming Frog SEO Spider, type or copy in the website you wish to crawl in the Enter URL to spider box and hit Start.
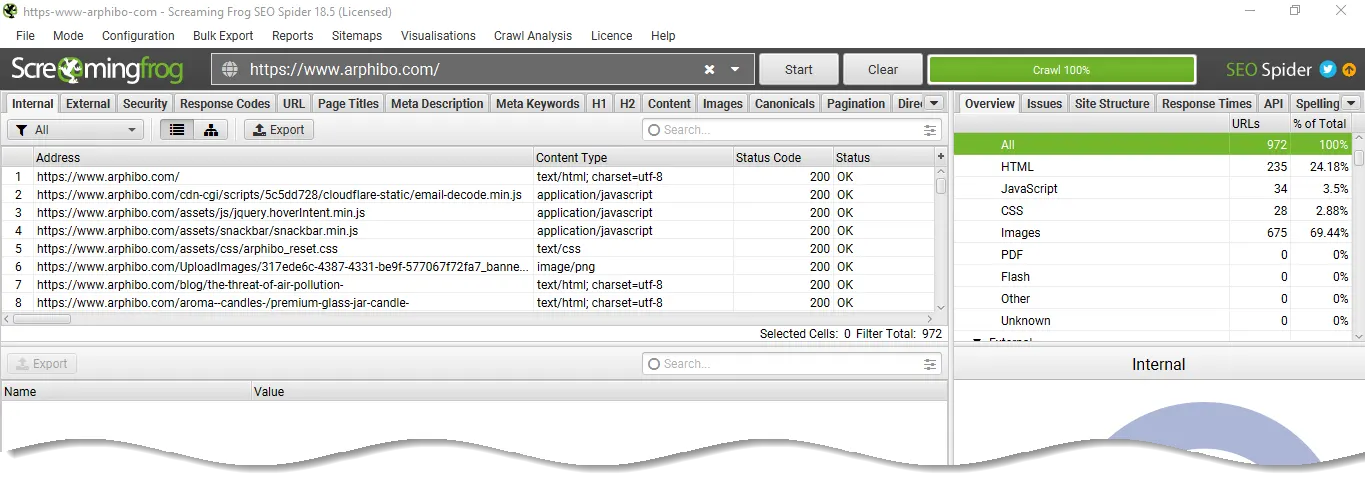
Wait until the crawl finishes and reaches 100%, but you can also view some details in real-time.
Step 4: View Duplicates In The Content Tab
The Content tab has 2 filters related to duplicate content, ‘exact duplicates’ and ‘near duplicates’.
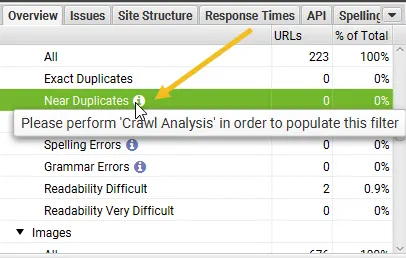
Only ‘exact duplicates’ is available to view in real-time during a crawl. ‘Near Duplicates’ require calculation at the end of the crawl via post ‘Crawl Analysis‘ for it to be populated with data.
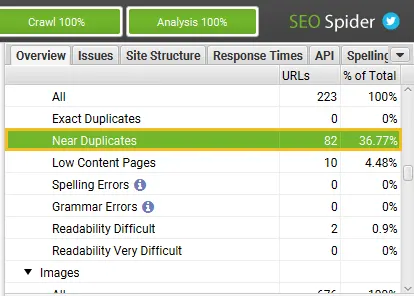
The right hand ‘overview’ pane, displays a ‘Crawl Analysis Required’ message that require post crawl analysis to be populated with data.
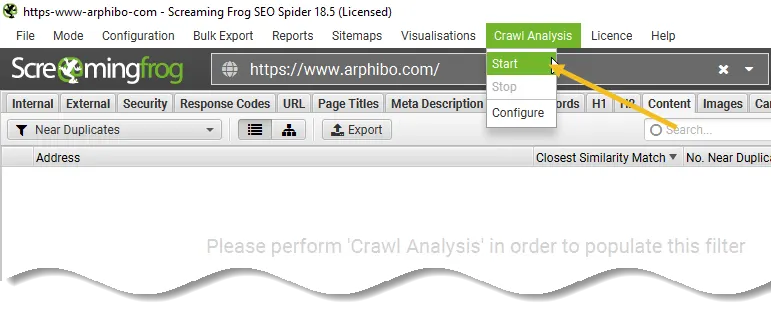
Step 5: Click ‘Crawl Analysis > Start’ To Populate ‘Near Duplicates’ Filter
To populate the ‘Near Duplicates’ filter, the ‘Closest Similarity Match’ and ‘No. Near Duplicates’ columns, you just need to click a button at the end of the crawl.
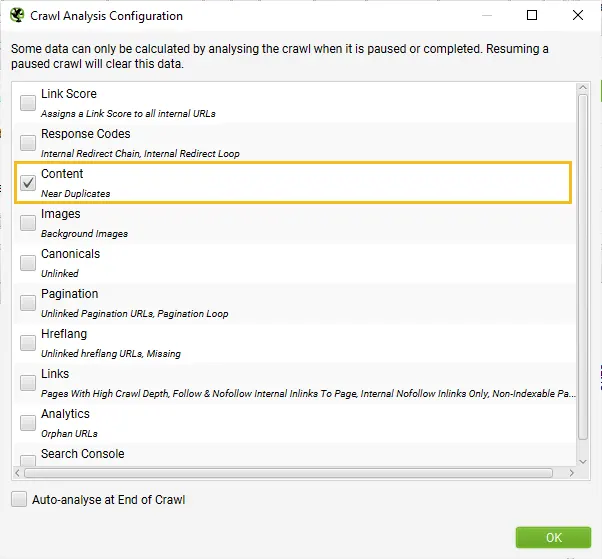
However, if you have configured ‘Crawl Analysis’ previously, you may wish to double-check, under ‘Crawl Analysis > Configure’ that ‘Near Duplicates’ is ticked.
You can also untick other items that also require post crawl analysis to make this step quicker.
When crawl analysis has completed the ‘analysis’ progress bar will be at 100% and the filters will no longer have the ‘(Crawl Analysis Required)’ message.
You can now view the populated near-duplicate filter and columns.
Step 6: View ‘Content’ Tab & ‘Exact’ & ‘Near’ Duplicates Filters
After performing post crawl analysis, the ‘Near Duplicates’ filter, the ‘Closest Similarity Match’ and ‘No. Near Duplicates’ columns will be populated.
Only URLs with content over the selected similarity threshold will contain data, the others will remain blank.
You’re able to filter by the following –
Exact Duplicates – This filter will show pages that are identical to each other using the MD5 algorithm which calculates a ‘hash’ value for each page and can be seen in the ‘hash’ column.
This check is performed against the full HTML of the page. It will show all pages with matching hash values that are exactly the same. Exact duplicate pages can lead to the splitting of PageRank signals and unpredictability in ranking.
There should only be a single canonical version of a URL that exists and is linked to internally. Other versions should not be linked to, and they should be 301 redirected to the canonical version.
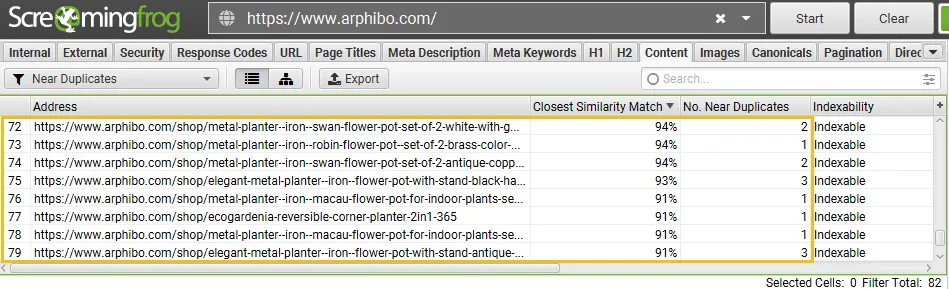
Near Duplicates – This filter will show similar pages based upon the configured similarity threshold using the minhash algorithm. The threshold can be adjusted under ‘Config > Spider > Content’ and is set at 90% by default.
The ‘Closest Similarity Match’ column displays the highest percentage of similarity to another page. The ‘No. Near Duplicates’ column displays the number of pages that are similar to the page based upon the similarity threshold.
The algorithm is run against text on the page, rather than the full HTML like exact duplicates.
The content used for this analysis can be configured under ‘Config > Content > Area’. Pages can have a 100% similarity, but only be a ‘near duplicate’ rather than exact duplicate.
This is because exact duplicates are excluded as near duplicates, to avoid them being flagged twice. Similarity scores are also rounded, so 99.5% or higher will be displayed as 100%.
Near duplicate pages should be manually reviewed as there are many legitimate reasons for some pages to be very similar in content, such as variations of products that have search volume around their specific attribute.
However, URLs flagged as near-duplicates should be reviewed to consider whether they should exist as separate pages due to their unique value for the user, or if they should be removed, consolidated or improved to make the content more in-depth and unique.
Step 7: View Duplicate URLs Via The ‘Duplicate Details’ Tab
For ‘exact duplicates’, it’s easier to just view them in the top window by using the filter – as they are grouped together and share the same ‘hash’ value.

Example from BBC Website
In the above screenshot, each URL has a corresponding exact duplicate due to a trailing slash and non-trailing slash version.
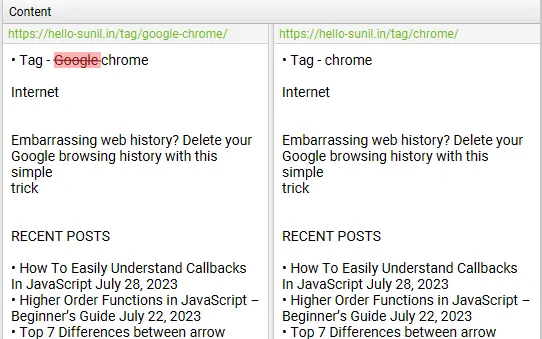
For ‘near duplicates’, click the ‘Duplicate Details’ tab at the bottom which populates the lower window pane with the ‘near duplicate address’ and similarity of each near-duplicate URL discovered.
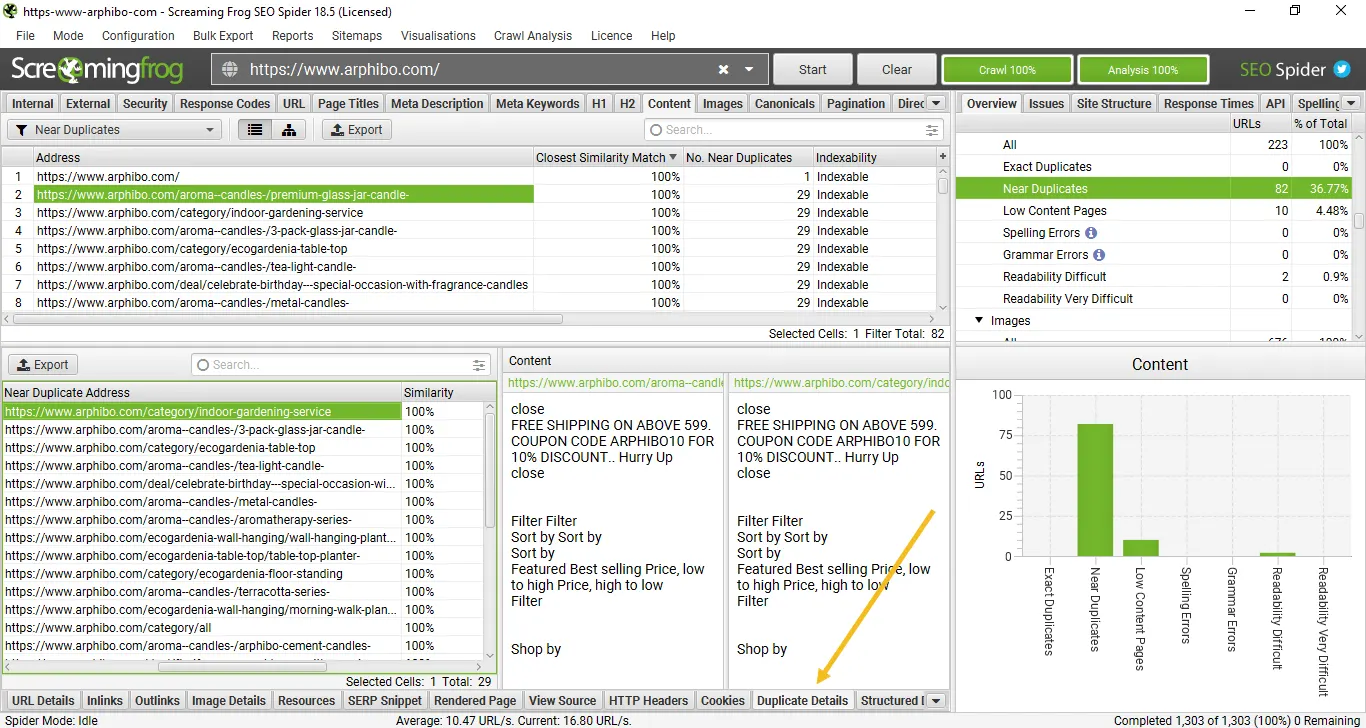
For example, if there are 2 near-duplicates discovered for a URL in the top window, these can all be viewed.
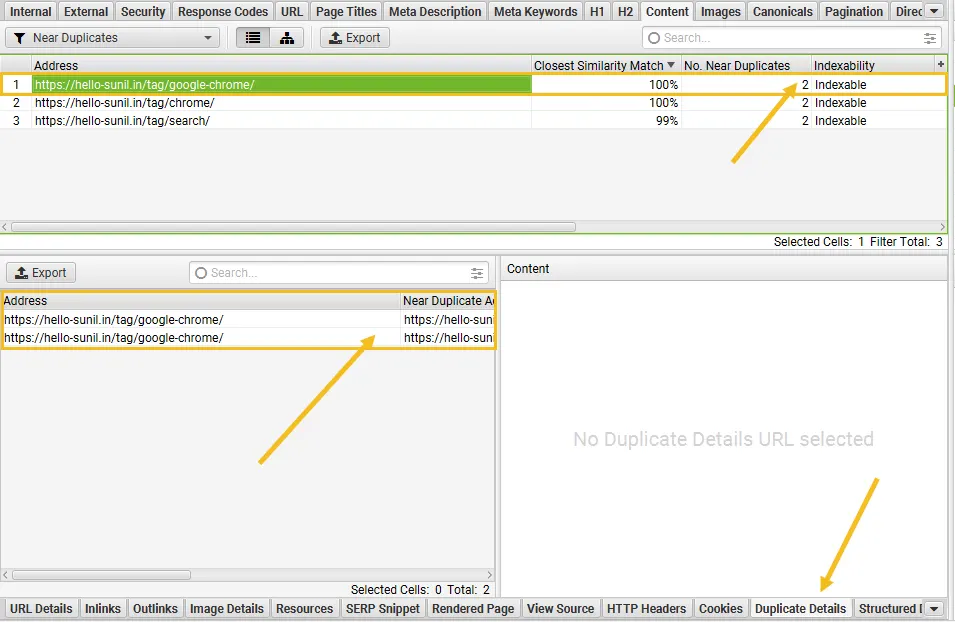
The right-hand side of the ‘Duplicate Details’ tab will display the near duplicate content discovered from the pages and highlight the differences between the pages when you click on each ‘near duplicate address’.
If there is any duplicate content in the duplicate details tab that you don’t wish to be part of the duplicate content analysis, exclude or include any HTML elements, classes or IDs (as highlighted in step 2), & re-run crawl analysis.
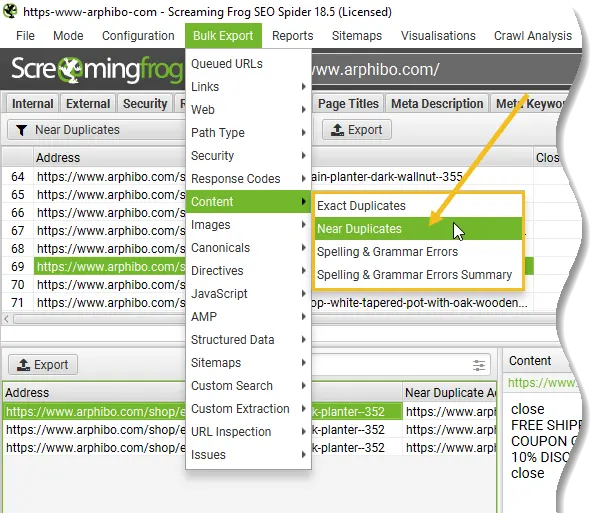
Step 8: Bulk Export Duplicates
Both exact and near-duplicates can be exported in bulk via the ‘Bulk Export > Content > Exact Duplicates’ and ‘Near Duplicates’ exports.
Final Tip! Refine Similarity Threshold & Content Area, & Re-run Crawl Analysis
Post-crawl you are able to adjust both the near duplicate similarity threshold, and content area used for near-duplicate analysis.
You can then re-run crawl analysis again to find more or less similar content – without re-crawling the website.
Conclusion
Canonical tags aren’t that complicated. They’re just hard to get your head around initially.
Just remember that canonical tags are not a directive but rather a signal for search engines. In other words, they may choose a different canonical to the one you declare.
Resource
- Canonical URLs: A Beginner’s Guide to Canonical Tags
- Consolidate Duplicate URL – Google Search Central
- How To Check For Duplicate Content
- Canonical Tags Guide – ahrefs
- rel=canonical: the ultimate guide – Yoast
- How to use canonical tags properly
- Duplicate content issues on my shop
- Duplicate Content SEO


Add comment