
Loops are used in JavaScript to perform repeated tasks based on a condition. Conditions typically return true or false. A loop will continue running until the defined condition returns false.
Many JavaScript developers are familiar with loops, but not everyone understands how they work and why or when they should use a specific type of loop.
In this article, we will learn what JavaScript loops are, how they work, and why we use them.
What are JavaScript Loops?
In programming, loops are used to repeat a block of code.
For example, suppose we want to print “Hello World” 10 times. This can be done in two ways as shown below:
- Iterative Method
- Using Loops
Iterative Method: The iterative method to do this is to write the console.log() statement 10 times.
console.log("Hello World");
console.log("Hello World");
console.log("Hello World");
console.log("Hello World");
console.log("Hello World");
console.log("Hello World");
console.log("Hello World");
console.log("Hello World");
console.log("Hello World");
console.log("Hello World");
Using Loops: In Loop, the statement needs to be written only once and the loop will be executed 10 times as shown below:
for (let i = 0; i < 10; i++) {
    console.log("Hello World!");
}
Many things may seem confusing to you in the above program at this point of time but do not worry you will be able to understand everything about loops in JavaScript by the end of this tutorial.
You can observe that in the above program using loops, we have used the console.log statement only once but still, the output of the program will be the same as that of the iterative program where we have used the console.log statement 10 times.
JavaScript mainly provides the following ways for executing the loops:
- for loop
- for…in loop
- for…of loop
- forEach()
- map()
- reduce()
- filter()
- while loop
- do…while loop
While all the ways provide similar basic functionality, they differ in their syntax and condition-checking time. Let us learn about each one of these in detail.
JavaScript for loop
The JavaScript for loop iterates the elements for the fixed number of times. It should be used if number of iteration is known.
The syntax of for loop is given below:
for (initialExpression; condition; updateExpression) {
    // for loop body
}
The for loop consists of three optional expressions, followed by a code block:
- initialExpression – Here, we initialize the variable in use. It marks the start of a for loop. An already declared variable can be used or a variable can be declared, local to loop only.
- condition – This expression is checked each time before the loop runs. If it evaluates to true, the code in the loop is executed. If it evaluates to false, the loop stops. And if this expression is omitted, it automatically evaluates to true.
- updateExpression – This expression is executed after each iteration of the loop. This is usually used to increment a counter, but can be used to decrement a counter instead.
For better understanding look at the flowchart of a for loop:
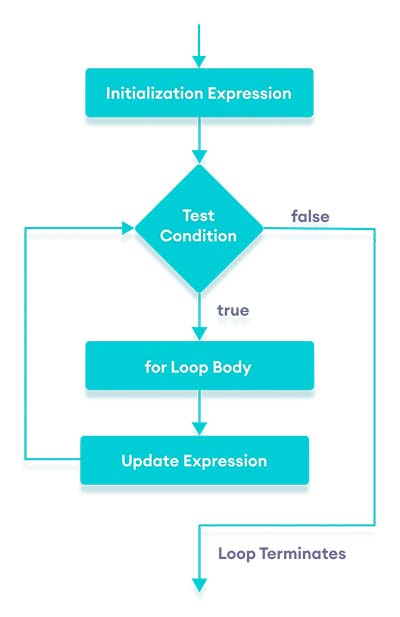
Flowchart of JavaScript for loop
Let’s use a basic example to demonstrate what each of these statements does.
JavaScript for loop Example – 1
// Initialize a for loop with 5 iterations
for (let i = 0; i < 4; i++) {
    // Print each iteration to the console
    console.log(i);
}

/*Output: -------------------
0
1
2
3
-----------------------------*/
In the above example, we initialized the for loop with let i = 0, which begins the loop at 0.
We set the condition to be i < 4, meaning that as long as i evaluates as less than 4, the loop will continue to run.
Our final expression of i++ increments the count for each iteration through the loop.
The console.log(i) prints out the numbers, starting with 0 and stopping as soon as i is evaluated as 4.
Let’s go over each expression in the loop to understand them fully.
initialExpression: Our first expression is the initialization. This is what it looks like.
let i = 0;We are declaring a variable called i with the let keyword (the keyword var may also be used) and giving it a value of 0.
While the variable can be named anything, i is most frequently used. The variable i stands for iteration, is consistent, and keeps the code compact.
Condition: for loops usually contain a condition. Here is our condition statement.
i < 4;We already established that our iteration variable, i, represents 0 to start. Now we are saying that the condition is true as long as i is less than 4 in this example.
updateExpression: The updateExpression is a statement that is executed at the end of each loop.
It is most often used to increment or decrement a value, but it can be used for any purpose.
i++In our example, we are incrementing the variable by one, with i++. This is the same as running i = i + 1.
Unlike the initialization and condition expressions, the updateExpression does not end with a semicolon.
Putting it Together
Now that we have reviewed our three expressions contained in the for loop, we can take a look at the complete loop again.
// Initialize a for loop with 5 iterations
for (let i = 0; i < 4; i++) {
    // Print each iteration to the console
    console.log(i);
}

/*Output: -------------------
0
1
2
3
-----------------------------*/
First, we are declaring i and setting it to 0. Then, we are setting a condition for the loop to run until i is less than 4.
Finally, we are incrementing i by one 1 each iteration. Our code block prints the value of i to the console, so our result is 0, 1, 2, and 3 as output.
JavaScript for loop Example – 2 (Iterate Over an Array)
Here is an example of how you might use a for loop to loop through an array and log each element to the console:
// Declare array with 3 items
let fish = ["Rohu", "salmon", "Mackerel"];

// Initalize for loop to run for the total length of an array
for (let i = 0; i < fish.length; i++) {
    // Print each item to the console
    console.log(fish[i]);
}

/*Output: -------------------
Rohu
Salmon
Mackerel
-----------------------------*/
In this example, the iterator variable i is initialized to 0. i in this case refers to accessing the index of the array.
This means that the loop will access the first array value when it runs for the first time.
The condition i < fish.length tells the loop when to stop, and the increment statement i++ tells how much to increment the iterator variable for each loop.
In other words, the loop starts at 0 index, checks the length of the array, prints out the value to the screen, and then increases the variable by 1.
The loop prints out the contents of the array one at a time and when it reaches its length, it stops.
JavaScript for…in loop
The for…in loop iterates over the properties of an object.
The syntax of the for…in loop is:
for (key in object) {
    // body of for...in
}
In each iteration of the loop, a key is assigned to the key variable. The loop continues for all object properties.
To demonstrate, we will make a simple shark object with a few name:value pairs.
const shark = {
    species: "great white",
    color: "white",
    numberOfTeeth: Infinity
}
Using the for…in loop, we can easily access each of the property names.
const shark = {
    species: "great white",
    color: "white",
    numberOfTeeth: Infinity
}

// Print property names of object
for (attribute in shark) {
    console.log(attribute);
}


/*Output: -------------------
species
color
numberOfTeeth
-----------------------------*/
We can also access the values of each property by using the property name as the index value of the object.
const shark = {
    species: "great white",
    color: "white",
    numberOfTeeth: Infinity
}


// Print property values of object
for (attribute in shark) {
	console.log(shark[attribute]);
}


/*Output: -------------------
great white
white
Infinity
-----------------------------*/
Putting them together, we can access all the names and values of an object.
const shark = {
    species: "great white",
    color: "white",
    numberOfTeeth: Infinity
}


// Print names and values of object properties
for (attribute in shark) {
	console.log(`${attribute}`.toUpperCase() + `: ${shark[attribute]}`);
}


/*Output: -------------------
SPECIES: great white
COLOR: white
NUMBEROFTEETH: Infinity
-----------------------------*/
We used the toUpperCase() method to modify the property name, and following it by the property value.
So for…in loop is an extremely useful way to iterate through object properties.
JavaScript for…of loop
The for…in statement is useful for iterating over object properties, but to iterate over iterable objects like arrays and strings, we can use the for…of statement.
The for…of statement is a newer feature as of ES6 and the syntax of the for…of loop is:
for (element of iterable) {
    // body of for...of
}
Here,
- iterable – an iterable object (array, set, strings, etc).
- element – items in the iterable
In plain English, you can read the above code as: for every element in the iterable, run the body of the loop.
The for..of loop in JavaScript allows you to iterate over iterable objects (arrays, sets, maps, strings etc).
In this example of a for…of loop, we will create an array and print each item in the array to the console.
// Initialize array of shark species
let sharks = [ "great white", "tiger", "hammerhead" ];

// Print out each type of shark
for (let shark of sharks) {
	console.log(shark);
}


/*Output: -------------------
great white
tiger
hammerhead
-----------------------------*/
It is also possible to print out the index associated with the index elements using the entries() method.
// Initialize array of shark species
let sharks = [ "great white", "tiger", "hammerhead" ];

// Loop through both index and element
for (let [index, shark] of sharks.entries()) {
	console.log(index, shark);
}


/*Output: -------------------
0 great white
1 tiger
2 hammerhead
JavaScript for…in VS JavaScript for…of
- for…in loop – It is use to loop over object properties
- for…of – It is use to loop over iterable objects (arrays, strings)
JavaScript forEach()
The forEach() method calls a function and iterates over the elements of an array.
What does it mean?
It means, the forEach() method is also used to loop through arrays, but it uses a function differently than the classic for loop in JavaScript.
The syntax of the forEach() method is:
array.forEach(callback(currentValue, index, arr))
The forEach() method passes a callback function for each element of an array together with the following parameters:
- currentValue (required) – The value of the current array element
- Index (optional) – The current element’s index number
- Array (optional) – The array object to which the current element belongs
Let us explain these parameters step by step.
Firstly, to loop through an array by using the forEach() method, you need a callback function:
numbers.forEach(function() {
    // code
})
The function will be executed for every single element of the array. It must take at least one parameter which represents the elements of an array:
numbers.forEach(function(number) {
    console.log(number);
});
That’s all we need to do for looping through the array.

Alternatively, you can use the ES6 arrow function representation for simplifying the code:
numbers.forEach(number => console.log(number));Alright now let’s continue with the optional parameters.
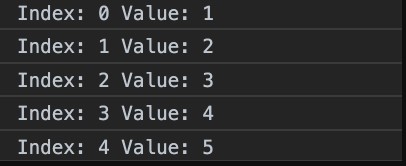
Index: The first one is the index parameter, which represents the index number of each element.
Basically, we can see the index number of an element if we include it as a second parameter:
numbers.forEach((number, index) => {
    console.log('Index: ' + index + ' Value: ' + number);
});
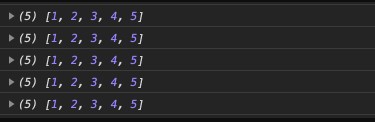
Array: The array parameter is the array itself. It is also optional and can be used if necessary in various operations. Otherwise, if we call it, it will just get printed as many times as the number of elements of the array:
numbers.forEach((number, index, array) => {
    console.log(array);
});
JavaScript forEach() Example
Assume we have an array of employee details that includes their names, age, salary amount, and currency:
const staffsDetails = [
  { name: "Jam Josh", age: 44, salary: 4000, currency: "USD" },
  { name: "Justina Kap", age: 34, salary: 3000, currency: "USD" },
  { name: "Chris Colt", age: 37, salary: 3700, currency: "USD" },
  { name: "Jane Doe", age: 24, salary: 4200, currency: "USD" }
];
If we want to display all of the names individually with some words around them, we can use the forEach() method as follows:
const staffsDetails = [
  { name: "Jam Josh", age: 44, salary: 4000, currency: "USD" },
  { name: "Justina Kap", age: 34, salary: 3000, currency: "USD" },
  { name: "Chris Colt", age: 37, salary: 3700, currency: "USD" },
  { name: "Jane Doe", age: 24, salary: 4200, currency: "USD" }
];

staffsDetails.forEach((staffDetail) => {
  let sentence = `I am ${staffDetail.name} a staff of Royal Suites.`;
  console.log(sentence);
});

/*Output: -------------------
I am Jam Josh a staff of Royal Suites.
I am Justina Kap a staff of Royal Suites.
I am Chris Colt a staff of Royal Suites.
I am Jane Doe a staff of Royal Suites.
-----------------------------*/
We could also get the index of each array item by just making use of the unbuilt index argument this way:
const staffsDetails = [
  { name: "Jam Josh", age: 44, salary: 4000, currency: "USD" },
  { name: "Justina Kap", age: 34, salary: 3000, currency: "USD" },
  { name: "Chris Colt", age: 37, salary: 3700, currency: "USD" },
  { name: "Jane Doe", age: 24, salary: 4200, currency: "USD" }
];


staffsDetails.forEach((staffDetail, index) => {
  let sentence = `index ${index} : I am ${staffDetail.name} a staff of Royal Suites.`;
  console.log(sentence);
});

/*Output: -------------------
index 0 : I am Jam Josh a staff of Royal Suites.
index 1 : I am Justina Kap a staff of Royal Suites.
index 2 : I am Chris Colt a staff of Royal Suites.
index 3 : I am Jane Doe a staff of Royal Suites.
-----------------------------*/
The array argument is the third argument which holds the original array that is being iterated over.
For example, we could try displaying the value in our console this way:
const staffsDetails = [
  { name: "Jam Josh", age: 44, salary: 4000, currency: "USD" },
  { name: "Justina Kap", age: 34, salary: 3000, currency: "USD" }
];


staffsDetails.forEach((staffDetail, index, array) => {
  console.log(array);
});

/*Output: -------------------
[
  { name: 'Jam Josh', age: 44, salary: 4000, currency: 'USD' },
  { name: 'Justina Kap', age: 34, salary: 3000, currency: 'USD' }
]
[
  { name: 'Jam Josh', age: 44, salary: 4000, currency: 'USD' },
  { name: 'Justina Kap', age: 34, salary: 3000, currency: 'USD' }
]
-----------------------------*/
This would output the entire array 2 times since we have 2 items and the iteration runs 2 times.
Let’s do it for an array with a few values so we can add the output here:
let scores = [12, 55, 70];

scores.forEach((score, index, array) => {
  console.log(array);
});

/*Output: -------------------
[ 12, 55, 70 ]
[ 12, 55, 70 ]
[ 12, 55, 70 ]
-----------------------------*/
JavaScript map()
The map() method is used for array transformation. It takes another custom function as an argument and on each array item applies that function.
Also Read: Quick Tutorial – JavaScript map Method 🚀
The syntax of the map() method is:
map((currentValue) => { /* … */ })
map((currentValue, index) => { /* … */ })
map((currentValue, index, array) => { /* … */ })
function(currentValue, index, array): It is a required parameter and it runs on each element of the array. It contains three parameters which are listed below:
- currentValue: It is a required parameter and it holds the value of the current element.
- index: It is an optional parameter and it holds the index of the current element.
- array: It is an optional parameter and it holds the array.
Kindly remember, it returns a new array and elements of the arrays are the result of the callback function.
JavaScript map() Example
const numbers = [1, 2, 3, 4, 5];

// Use map() to double each number in the array
const doubledNumbers = numbers.map((currentValue) => {
  return currentValue * 2;
});

console.log(doubledNumbers); // Output: [2, 4, 6, 8, 10]
In this example:
- We have an array called
numberscontaining integers. - We use the
map()method to create a new array calleddoubledNumbers. - Inside the
map()function, we provide a callback that doubles each value in the original array.
JavaScript reduce()
JavaScript reduce() method helps you convert an array into a single value.
Also Read: JavaScript Array Reduce Method With Examples
JavaScript’s reduce() method implements what is known as folding in math. To put it simply, folding means you reduce a list of numbers into a single value.
For instance, calculating the sum of a list of numbers is a great real-life example of folding.
Example: 1+2+3 = 6
When you calculate the sum of a list of numbers, you:
- Take the first number and add the second number to it.
- Keep the result in your mind.
- Take the second number and add it to the result.
- Keep the result in your mind.
- Take the third number and add it to the result.
- You repeat this process until you have summed up all the numbers in the list.
This is exactly how the reduce() method works in JavaScript.
The reduction generally follows this procedure:
- Call a function on the first two elements of an array to get a partial result.
- Call the function on this partial result and the third element of the array to get a new partial result.
- Repeat this process until there are no values left in the array.
- Return the result.
Now you understand the working principle of the reduce() method.
To learn how to use the reduce() method, let’s start by learning its syntax.
arr.reduce(callback(accumulator, currentValue), initialValue)
The reduce() method in JavaScript helps to execute a reducer function on each element of the array and returns a single output value. To put it simply, the reduce() method reduces the array to a single value.
Here, arr is an array.
callback – The callback function to execute on each array element (except the first element if no initialValue is provided).
Also, this function is commonly known as a reducer. This function has to return a value.
It takes in –
accumulator– It accumulates the callback’s return valuescurrentValue– The current element being passed from the array
initialValue (optional) – A value that will be passed to callback() on first call. If not provided, the first element acts as the accumulator on the first call and callback() won’t execute on it.
Kindly note, calling reduce() on an empty array without initialValue will throw TypeError.
To make more sense of this, let’s see an example.
JavaScript reduce() Example
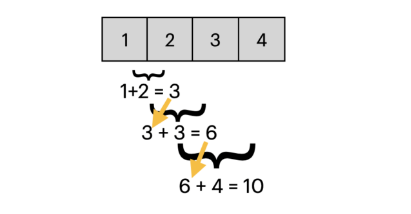
Perhaps the easiest example to demonstrate reduce() is by summing up numbers in an array of numbers.
const numbers = [1, 2, 3, 4]
const sum = numbers.reduce(function(accumulator, currentValue)
{
    return accumulator + currentValue

}, 0)

console.log(sum) //10
Here the reduce() method takes a function that sums up two arguments accumulator and currentValue, where accumulator represents the result so far and currentValue is the current element.
The second argument in the reduce() function is 0. This is the initial value we want the sum to start from.
Under the hood, here are the calculations made by this particular reduce() method call:
0 + 1 = 1
1 + 2 = 3
3 + 3 = 6
6 + 4 = 10
Here is a great illustration of the process:
JavaScript filter()
Before the introduction of ES6, many JavaScript developers relied on the for loop method to handle almost all array manipulation.
But the code can become quite long and not easy to understand, which led to the release of many individual JavaScript methods like the filter() method.
The filter() method returns a new array with all elements that pass the test defined by the given function.
The syntax of the filter() method is:
myArray.filter(callbackFn)In the callback function, you have access to each element, the index, and the original array itself:
myArray.filter((element, index, array) => { /* ... */ })
JavaScript filter() Example – 1
In this example, the filter() method creates a new array consisting of only those elements that satisfy the condition checked by canVote() function.
// JavaScript to illustrate filter() method
function canVote(age) {
    return age >= 18;
}

function func() {
    let filtered = [24, 33, 16, 40].filter(canVote);
    console.log(filtered);
}
func();

/*Output: -------------------
[ 24, 33, 40 ]
-----------------------------*/
JavaScript filter() Example – 2
In this example, the filter() method creates a new array consisting of only those elements that satisfy the condition checked by isPositive() function.
function isPositive(value) {
    return value > 0;
}

let filtered = [112, 52, 0, -1, 944].filter(isPositive);
console.log(filtered);

/*Output: -------------------
[ 112, 52, 944 ]
-----------------------------*/
JavaScript filter() Example – 3
In this example, the filter() method creates a new array consisting of only those elements that satisfy the condition checked by isEven() function.
function isEven(value) {
    return value % 2 == 0;
}

let filtered = [11, 98, 31, 23, 944].filter(isEven);
console.log(filtered);

/*Output: -------------------
[ 98, 944 ]
-----------------------------*/
JavaScript while loop
JavaScript while loop iterates the elements for the infinite number of times. It should be used if number of iteration is not known.
So while loop can be thought of as a repeating if statement.
The syntax of while loop is given below.
while (condition) {
    // body of loop
}
Here,
- A
whileloop evaluates the condition inside the parenthesis(). - If the condition evaluates to
true, the code inside thewhileloop is executed. - The condition is evaluated again.
- This process continues until the condition is
false. - When the condition evaluates to
false, the loop stops.
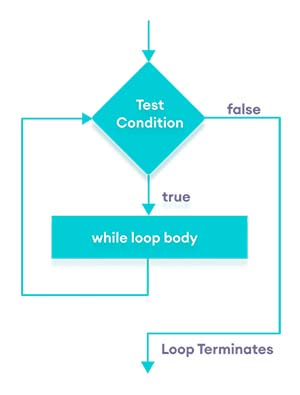
Flowchart of JavaScript while loop
JavaScript while loop Example – 1
In this example, we will display numbers from 1 to 5 through JavaScript’s while loop:
// program to display numbers from 1 to 5
// initialize the variable
let i = 1, n = 5;

// while loop from i = 1 to 5
while (i <= n) {
    console.log(i);
    i += 1;
}

/*Output: -------------------
1
2
3
4
5
-----------------------------*/
JavaScript while loop Example – 2
While a variable is less than 10, log it to the console and increment it by 1:
let i = 1;

while (i < 10) {
  console.log(i);
  i++;
}

/*Output: -------------------
1
2
3
4
5
6
7
8
9
-----------------------------*/
JavaScript do…while loop
JavaScript do…while loop iterates the elements for the infinite number of times like while loop. But, code is executed at least once whether condition is true or false.
The syntax of do…while loop is:
do {
    // body of loop
} while(condition)
Here,
- The body of the loop is executed at first. Then the condition is evaluated.
- If the condition evaluates to
true, the body of the loop inside thedostatement is executed again. - The condition is evaluated once again.
- If the condition evaluates to
true, the body of the loop inside thedostatement is executed again. - This process continues until the condition evaluates to
false. Then the loop stops.
Kindly note that, do…while loop is similar to the while loop. The only difference is that in do…while loop, the body of loop is executed at least once.
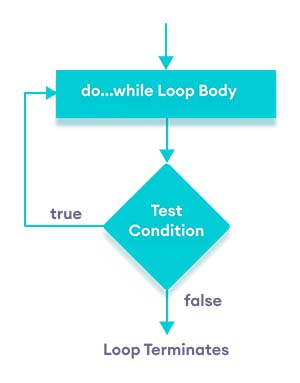
Flowchart of JavaScript do…while loop
JavaScript do…while loop Example – 1
In this example, we will display numbers from 1 to 5 through JavaScript’s do…while loop:
// program to display numbers
let i = 1;
const n = 5;

// do...while loop from 1 to 5
do {
    console.log(i);
    i++;
} while(i <= n);

/*Output: -------------------
1
2
3
4
5
-----------------------------*/
Conclusion
Loops are an integral part of programming in JavaScript, and are used for automating repetitive tasks and making code more concise and efficient.
Always learn right and carry on the learning process!🙂🥦💻


Add comment