
When working with CSS conflicting styles can be a thorn in your side, especially when you don’t know where the conflict is originating from. This tutorial will give you a firm understanding of CSS specificity which will help fill in any knowledge gaps so you don’t end up pulling your hair out of frustration.
To understand this concept better, it’s important that you should understand a related topic i.e. cascading in CSS.
Cascading nature of CSS
CSS stands for Cascading Style Sheets. “Cascading” means that the order in which CSS rules are applied to an element actually matters.
Ideally, if two rules are applied to the same element, the one that comes last is the one that will be used. Let’s use an example to understand this.
Here we are applying two classes to an element and give each class a different background-color property.
  <body>
    <p class="style1 style2"> This is a test paragraph</p>
  </body>
.style2 {
background-color: red;
}
.style1 {
background-color: yellow;
}
Notice that the style1 which comes last in the stylesheet is applied to the element. Now you may expect this to always be how CSS applies styles to elements, but it’s not always the case.
Take this next example.
  <body>
    <p class="style1" id="paragraph"> This is a test paragraph</p>
  </body>
#paragraph {
background-color: red;
}
.style1 {
background-color: yellow;
}
Notice that the first is applied. The #paragraph is an id selector, while the style1 is a class selector. This is because cascade works with specificity to determine which values are applied to an element.
Must Read: CSS Selectors – The ultimate guide on simple selectors
💡 Note
One way to combat messy CSS, and ensure your specificity rules are being applied as intended, is to adopt a CSS naming architecture.
Block-element-modifier (BEM) is one of the most commonly used CSS naming architectures, which help you to ensure that your styles aren’t overriding each other.
So, what is CSS specificity?
What is CSS specificity?
Specificity is the way which helps the browsers to decide which property value is most relevant for the element and, therefore, will be applied.
That means when more than one set of CSS rules apply to the same element, the browser will have to decide which specific set will be applied to the element. The rules the browser follows are collectively called Specificity.
Specificity is a common reason why your CSS-rules don’t apply to some elements, although you think they should.
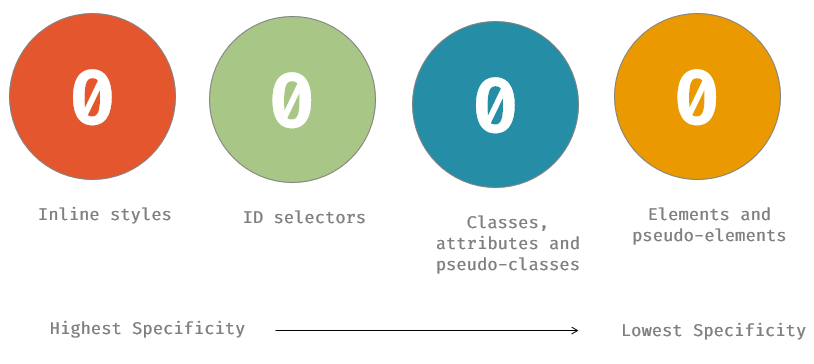
Understanding the hierarchy of CSS specificity
Selectors define how you target the element you want to style in CSS, so every selector has its place in the specificity hierarchy. There are four distinct categories which define the specificity level of a given selector and they are as follows:
- Inline styles
- ID selectors
- Classes, attributes and pseudo-classes
- Elements and pseudo-elements
Selectors are what allows you to target specific HTML elements and apply style to them.

How to calculate CSS specificity
Calculating the specificity values of selectors is quite tricky. One way to calculate it is to use a weight system to rank different selectors to create an hierarchy.
We have 4 slots, and each one of them starts at 0: _ _ _ _. The slot at the left is the most important, and the rightmost one is the least important.
Like it works for numbers in the decimal system: 1 0 0 0 is higher than 0 1 0 0.
We will assign weights to each selector for us to better understand how each selector ranks. Let’s start with the highest.
Inline styles
Inline styles are applied directly on the element in the HTML document. Here is an example:
  <body>
    <p style="color: red">This is a paragraph</p>
  </body>
Inline styles have the highest specificity. In our specificity weight system, they have a value of 1000.
ID selectors
ID selectors are used to target an element using the element’s ID. And, in our specificity weight system, they have a value of 100.
/* This is an ID selector  */
#header {
  color: red;
}
Classes, Attributes and Pseudo-classes
Here are examples of classes, attributes, and pseudo-classes:
 /* This is a class selector */
.person {
    color: red;
}

 /* This is an attribute selector */
[type="radio"] {
    color: red;
}

 /* This is a pseudo-class selector */
:focus {
    color: red;
}
They have a higher specificity than element and pseudo-element selectors. In our specificity weight system, they have a value of 10.
Elements and Pseudo-elements
We use element selectors like a, p, and div to style a selected element, while pseudo-elements like ::after and ::before are used to style specific parts of an element.
/* This is an element selector */
p {
    color: red;
}

/* This is an pseudo-element selector */
p::before {
    color: red;
}
Element and pseudo-element selectors have the lowest specificity. In our specificity weight system, they have a value of 1.
Here is a summary of the weights:
| Inline Styles | 1000 |
| ID selectors | 100 |
| Classes, Attributes and Pseudo-classes | 10 |
| Elements and Pseudo-elements | 1 |
CSS specificity rules and examples
You may be asking yourself Okay, CSS specificity is great but how do I make sense of it. To make it simple, now lets take few examples to understand how CSS specificity actually works in different scenario.
Example #1 – Inline styles have more specificity
Inline styles have the highest weight and their property value overrides every other selector’s value applied to an element.
Also Read: CSS Styles : Inline, External and Internal (Definitive Guide)
For example, if we have an element and for the same property color, there’s an inline style. If the class and id selectors also have values for the same property, the inline style wins.
💡 Note
The property values of selectors with a higher weight will always be applied over a selector with a lower weight.
  <body>
    <p style="color: red" class="yellow" id="paragraph">This is a paragraph</p>
  </body>
#paragraph {
color: green;
}
.yellow {
color: yellow;
}
The same thing happens when an ID selector and class selector have values for the same property. The property value of the ID selector will apply.
Example #2 – Multiple element selectors
There are times when more than one selector is used to target an element. For example, for a list like this:
  <body>
    <ul class="list">
      <li>First item</li>
      <li>Second item</li>
      <li>Third item</li>
    </ul>
  </body>
You may target the list items like this:
.list > li {
    color: green;
}
or like this:
ul > li {
    color: red;
}
In a case where both selectors are used on the same stylesheet, which style will be applied to the list items?
Also Read: CSS Selectors – Understanding CSS Combinators
Let’s go back to our weight system to calculate the specificity of both selectors.
For .list > li, the weight of one class selector is 10 and the weight of an element selector is 1. Combined their sum is 11.
For ul > li, the weight of one element selector is 1. There are two element selectors used, so their sum is 2.
Which of the color values do you will think will be applied?
If you said the color of the .list>li selector will be applied, you got it right. It has a higher specificity value than the other selector.

Let’s try another example. Given this element:
  <body>
    <div class="first-block" id="div-1">
      <div class="second-block" id="div-2">
        <p class="text" id="paragraph">This is a paragraph</p>
      </div>
    </div>
  </body>
and these styles
#div-1 > .second-block > .text {
  color: blue;
}

.first-block > #div-2 > #paragraph {
  color: red;
}
This is the result:

Let’s use again the weight system to understand why the color value of the second selector is applied.
For #div-1 > .second-block > .text, we have one ID selector and two class selectors. The sum of their weights is 100 + 10 + 10 = 120.
For .first-block > #div-2 > #paragraph, we have one class selector and two ID selectors. The sum of their weights is 10 + 100 + 100 = 210.
That’s why the value of latter selector is used.
Example #3 – In equal specificity, the latest rule will count
If multiple selectors are applied to the same HTML element and they have the same level of specificity, then the browser will apply the CSS rule of the selector that appeared later in the stylesheet.
Something like the example below:
  <body>
    <h1 class="hello-header">Hello World!</h1>
  </body>
.hello-header {
color: blue;
}
.hello-header {
color: red;
}
How do you override specificity in CSS?
The weight assigned to a selector just gives us an idea of which rules get applied to an element. However, this does not always suffice.
For instance, you may assume that if you use more than 10 classes (weight >= 100) to target an element, the property values will override that of one ID selector. But this is not true. As long as the selector with more than 10 classes have no ID selector, the one ID selector will always take precedence over it.
Applying !important to the property value of any selector makes it the value that will be applied to the element. This happens regardless of the rank of the selector on the specificity hierarchy.
💡 Note
The !important keyword is often used in a last-ditch attempt to win the CSS specificity wars when all else fails.
Let’s use an example to understand this.
  <body>
    <p class="blue" id="paragraph" style="color: green">This is a paragraph</p>
  </body>
If the following styles are applied
p {
  color: red !important;
}
.blue {
  color: blue;
}

#paragraph {
  color: purple;
}
The value of the element selector p will be used because of the !important attached to the value.
However, if another selector has the !important tag attached to the same property, the value of the later selector is used.

That’s why !important should be avoided because it makes it difficult to override a style.
Generally, to style a specific element, it is more advisable to use a class. This makes it easier to override the styles if you ever need to do so.
Universal Selector and Combinators
The universal selector (*) and combinators do not impact the weight of your selectors. Combinators include child selectors (>), general sibling selectors (~), and adjacent sibling selectors (+).
For example, if we have a paragraph with two spans, using a child combinator will not increase the specificity over not using it:
<body>
    <p id="gatorParagraph">
      <span class="reptile">eggs</span>
      <span class="reptile">nest</span>
    </p>
 </body>
#gatorParagraph > .reptile {
color: purple;
}
#gatorParagraph .reptile{
color: green;
}
These blocks of CSS has the same specificity – the child combinator makes no difference – so the text will be green.
CSS specificity tools & resources
CSS specificity isn’t hard, but it’s a skill which, when learned, will save you immense amount of pain and suffering.
By learning these key specificity rules, you will set yourself up to write organized and optimized CSS code.
Check out the resources and tools below for some more CSS specificity fun!
MDN web docs – Get more in-depth knowledge how CSS specificity calculated from MDN.
CSS specificity calculator – A visual way to understand CSS specificity. You can use polypane.app to perform the specificity calculation for you automatically.
Conclusion
We can see that CSS specificity is an important topic to understand in CSS because it can save you hours of debugging. With this knowledge, you can easily find out why your styles are not being applied.
Here are the major points to take out of this article:
- Due to the cascading nature of CSS, if two rules are applied to the same element, the one that comes last is the one that will be used.
- CSS specificity is a set of rules that determine which style is applied to an element.
!importantoverrides all other styles regardless of the specificity of the selector where it is used.- Universal selectors (
*) and the inherited values have lower specificity, i.e.,0,0,0,0specificity - Inline CSS -> Internal CSS -> External CSS
- CSS style applied by referencing external stylesheet has lowest precedence and is overridden by Internal and inline CSS.
- Internal CSS is overridden by inline CSS.
- Inline CSS has highest priority and overrides all other selectors.
When next time, you have issues with conflicting styles, don’t pull your hair out! Calm your nerves, remember the hierarchy of specificity that starts with inline styles through IDs, classes, attributes and pseudo-class selectors to elements and pseudo-element selectors.
We hope you found this article useful, feel free to leave any questions in the comments below. we will be glad to help out!


Add comment