
Axios is promise-based HTTP Client for Node.js and the browser, which gives you the ability to take advantage of JavaScript’s async and await for more readable asynchronous code.
Thus, it works equally well in front-end JavaScript applications and back-end Node servers.
In this guide, you will see exactly how to use Axios with React using tons of real-world examples featuring React hooks.
What is Axios?
Axios is a Promised-based JavaScript library that is used to send HTTP requests. You can think of it as an alternative to JavaScript’s native Fetch API.
Axios is a modern, Promise-based HTTP client library. This means that Axios is used to send an HTTP request and handle their responses, all using JavaScript’s promises.
📣 Also Read: Learn JavaScript Promises and Async/Await
Axios supports both Node.js and JavaScript in the browser.
Why Use Axios in React
There are a number of different libraries you can use to make these requests, so why choose Axios?
Here are few reasons why you should use Axios as your client to make HTTP requests:
- Make
XMLHttpRequestsfrom the browser - Make http requests from node.js
- Supports the Promise API
- Intercept request and response
- Transform request and response data
- Cancel requests
- Automatic transforms for JSON data
- Client side support for protecting against Cross-site request forgery (XSRF)
Where Do We Make HTTP Request in React
In a class based component, requests are made in componentDidMount() lifecycle while in a functional component, requests are made in react lifecycle hooks i.e. useEffect.
How to Set Up Axios with React
Using Axios with React is a very simple process. You need three things:
- An existing React project
- To install Axios with npm/yarn
- An API endpoint for making requests
The quickest way to create a new React application is by using vite.
📣 Also Read: Using Vite to create a new React app
If you have an existing React project, you just need to install Axios with npm (or any other package manager):
npm install axiosyarn add axiosFetching and Consuming Data with Axios
In this guide, we will use the JSON Placeholder API to get and change post data.
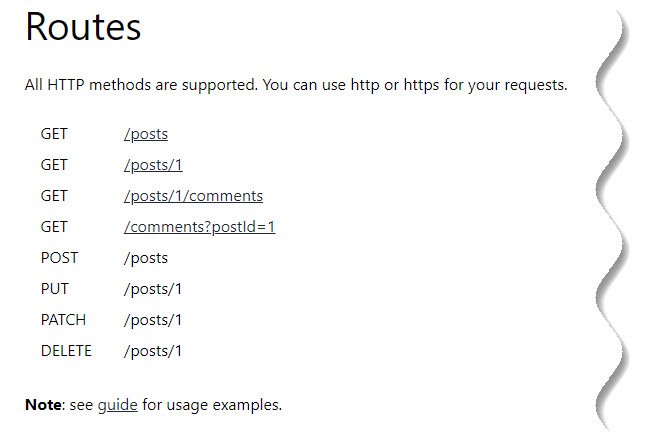
Here is a list of all the different routes you can make requests to, along with the appropriate HTTP method for each:
How to Make a GET Request
To fetch data or retrieve it, make a GET request.
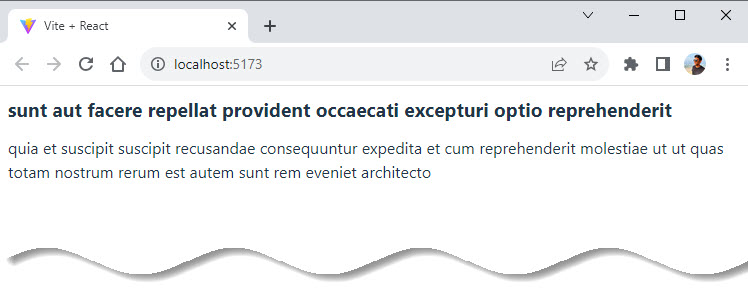
First, we are going to make a request for individual posts. If you look at the endpoint, you are getting the first post from the /posts endpoint:
GetRequest.jsx
import React, { useState, useEffect } from 'react';
import axios from 'axios';

const baseURL = 'https://jsonplaceholder.typicode.com/posts/1';

const GetRequest = () => {
  const [post, setPost] = useState(null);

  useEffect(() => {
    axios.get(baseURL).then((response) => {
      setPost(response.data);
    });
  }, []);
  if (!post) return null;

  return (
    <div>
      <h1>{post.title}</h1>
      <p>{post.body}</p>
    </div>
  );
};

export default GetRequest;
App.jsx
import './App.css';
import GetRequest from './GetRequest';

function App() {
  return (
    <>
      <GetRequest />
    </>
  );
}

export default App;
To perform this request when the component mounts, we use the useEffect hook. This involves importing Axios, using the .get() method to make a GET request to your endpoint, and using a .then() callback to get back all of the response data.
The response is returned as an object. The data (which is in this case a post with id, title, and body properties) is put in a piece of state called post which is displayed in the component.
Note that you can always find the requested data from the .data property in the response.
Result:
How to Make a POST Request
To create new data, make a POST request.
According to the API, this needs to be performed on the /posts endpoint. If we look at the code below, you will see that there is a button to create a post:
PostRequest.jsx
import React, { useState, useEffect } from 'react';
import axios from 'axios';

const baseURL = 'https://jsonplaceholder.typicode.com/posts';

const POSTRequest = () => {
  const [post, setPost] = useState(null);

  useEffect(() => {
    axios.get(`${baseURL}/1`).then((response) => {
      setPost(response.data);
    });
  }, []);

  function createPost() {
    axios
      .post(baseURL, {
        title: 'Hello World!',
        body: 'This is a new post written by Sunil.',
      })
      .then((response) => {
        setPost(response.data);
      });
  }
  if (!post) return 'No post!';
  return (
    <div>
      <h1>{post.title}</h1>
      <p>{post.body}</p>
      <button onClick={createPost}>Create Post</button>
    </div>
  );
};

export default POSTRequest;
App.jsx
import './App.css';
import POSTRequest from './POSTRequest';

function App() {
  return (
    <>
      <POSTRequest />
    </>
  );
}

export default App;
When we click on the button, it calls the createPost function.
To make that POST request with Axios, we use the .post() method. As the second argument, we include an object property that specifies what we want the new post to be.
Once again, use a .then() callback to get back the response data and replace the first post we got with the new post we requested.
This is very similar to the .get() method, but the new resource you want to create is provided as the second argument after the API endpoint.
Result:

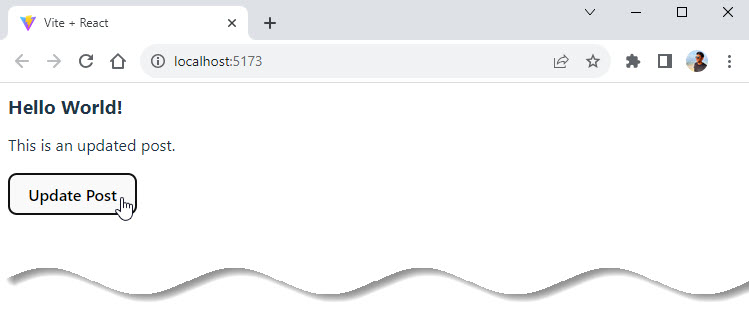
How to Make a PUT Request
To update a given resource, make a PUT request.
In this case, we will update the first post.
To do so, we will once again create a button. But this time, the button will call a function to update a post:
PutRequest.jsx
import React, { useState, useEffect } from 'react';
import axios from 'axios';

const baseURL = 'https://jsonplaceholder.typicode.com/posts';

const PutRequest = () => {
  const [post, setPost] = useState(null);

  useEffect(() => {
    axios.get(`${baseURL}/1`).then((response) => {
      setPost(response.data);
    });
  }, []);

  function updatePost() {
    axios
      .put(`${baseURL}/1`, {
        title: 'Hello World!',
        body: 'This is an updated post.',
      })
      .then((response) => {
        setPost(response.data);
      });
  }

  if (!post) return 'No post!';

  return (
    <div>
      <h1>{post.title}</h1>
      <p>{post.body}</p>
      <button onClick={updatePost}>Update Post</button>
    </div>
  );
};

export default PutRequest;
App.jsx
import './App.css';
import PutRequest from './PutRequest';

function App() {
  return (
    <>
      <PutRequest />
    </>
  );
}

export default App;
In the code above, we use the PUT method from Axios. And like with the POST method, we include the properties that we want to be in the updated resource.
Again, using the .then() callback, we update the JSX with the data that is returned.
Result:
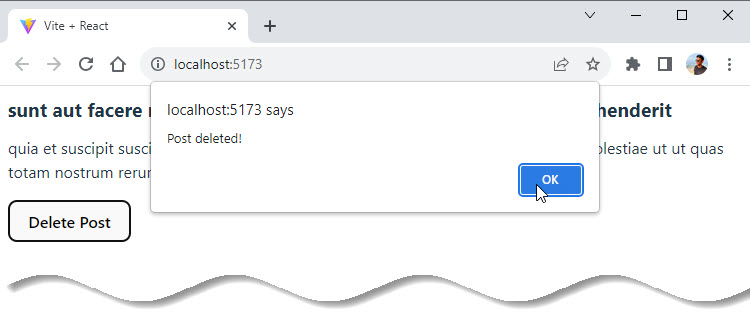
How to Make a DELETE Request
Finally, to delete a resource, use the DELETE method.
As an example, we will delete the first post.
Note that you do not need a second argument whatsoever to perform this request:
DeleteRequest.jsx
import React, { useState, useEffect } from 'react';
import axios from 'axios';

const baseURL = 'https://jsonplaceholder.typicode.com/posts';

const DeleteRequest = () => {
  const [post, setPost] = useState(null);

  useEffect(() => {
    axios.get(`${baseURL}/1`).then((response) => {
      setPost(response.data);
    });
  }, []);

  function deletePost() {
    axios.delete(`${baseURL}/1`).then(() => {
      alert('Post deleted!');
      setPost(null);
    });
  }

  if (!post) return 'No post!';

  return (
    <div>
      <h1>{post.title}</h1>
      <p>{post.body}</p>
      <button onClick={deletePost}>Delete Post</button>
    </div>
  );
};

export default DeleteRequest;
App.jsx
import './App.css';
import DeleteRequest from './DeleteRequest';

function App() {
  return (
    <>
      <DeleteRequest />
    </>
  );
}

export default App;
In most cases, we do not need the data that’s returned from the .delete() method.
But in the code above, the .then() callback is still used to ensure that your request is successfully resolved.
In the code above, after a post is deleted, the user is alerted that it was deleted successfully. Then, the post data is cleared out of the state by setting it to its initial value of null.
Also, once a post is deleted, the text “No post” is shown immediately after the alert message.
Result:
How to Handle Errors with Axios
What about handling errors with Axios?
What if there is an error while making a request? For example, you might pass along the wrong data, make a request to the wrong endpoint, or have a network error.
To simulate an error, we will send a request to an API endpoint that doesn’t exist: /posts/UFO.
This request will return a 404 status code:
📣 Also Read: The SEO’s Guide to HTTP Status Codes
HandleErrors.jsx
import React, { useState, useEffect } from 'react';
import axios from 'axios';

const baseURL = 'https://jsonplaceholder.typicode.com/posts';

const HandleErrors = () => {
  const [post, setPost] = useState(null);
  const [error, setError] = useState(null);

  useEffect(() => {
    // invalid url will trigger an 404 error
    axios
      .get(`${baseURL}/UFO`)
      .then((response) => {
        setPost(response.data);
      })
      .catch((error) => {
        setError(error);
      });
  }, []);

  if (error) return `Error: ${error.message}`;
  if (!post) return 'No post!';

  return (
    <div>
      <h1>{post.title}</h1>
      <p>{post.body}</p>
    </div>
  );
};

export default HandleErrors;
App.jsx
import './App.css';
import HandleErrors from './HandleErrors';

function App() {
  return (
    <>
      <HandleErrors />
    </>
  );
}

export default App;
In this case, instead of executing the .then() callback, Axios will throw an error and run the .catch() callback function.
📣 Also Read: How To Easily Understand Callbacks In JavaScript
In this function, we are taking the error data and putting it in state to alert our user about the error. So if we have an error, we will display that error message.
In this function, the error data is put in state and used to alert users about the error. So if there is an error, an error message is displayed.
When we run this code code, we will see the text, “Error: Request failed with status code 404”.
Result:

How to Create an Axios Instance
If we look at the previous examples, we will see that there is a baseURL that we use as part of the endpoint for Axios to perform these requests.
However, it gets a bit tedious to keep writing that baseURL for every single request. Couldn’t we just have Axios remember what baseURL we are using, since it always involves a similar endpoint?
In fact, we can. If we create an instance with the .create() method, Axios will remember that baseURL, plus other values you might want to specify for every request, including headers:
AxiosInstance.jsx
import React, { useState, useEffect } from 'react';
import axios from 'axios';

const client = axios.create({
  baseURL: 'https://jsonplaceholder.typicode.com/posts',
});

const AxiosInstance = () => {
  const [post, setPost] = useState(null);

  useEffect(() => {
    client.get('/1').then((response) => {
      setPost(response.data);
    });
  }, []);

  function deletePost() {
    client.delete('/2').then(() => {
      alert('Post deleted!');
      setPost(null);
    });
  }

  if (!post) return 'No post!';

  return (
    <div>
      <h1>{post.title}</h1>
      <p>{post.body}</p>
      <button onClick={deletePost}>Delete Post</button>
    </div>
  );
};

export default AxiosInstance;
App.jsx
import './App.css';
import AxiosInstance from './AxiosInstance';

function App() {
  return (
    <>
      <AxiosInstance />
    </>
  );
}

export default App;
The one property in the config object above is baseURL, to which you pass the endpoint.
The .create() function returns a newly created instance, which in this case is called client.
Then in the future, we can use all the same methods as we did before, but we don’t have to include the baseURL as the first argument anymore. We just have to reference the specific route we want, for example, /, /1, and so on.
Result:
How to Use the Async-Await Syntax with Axios
A big benefit to using promises in JavaScript (including React applications) is the async-await syntax.
📣 Also Read: Learn JavaScript Promises and Async/Await
Async-await allows us to write much cleaner code without then and catch callback functions. Plus, code with async-await looks a lot like synchronous code, and is easier to understand.
But how do you use the async-await syntax with Axios?
In the example below, posts are fetched and there’s still a button to delete that post:
AsyncAwait.jsx
import React, { useState, useEffect } from 'react';
import axios from 'axios';

const client = axios.create({
  baseURL: 'https://jsonplaceholder.typicode.com/posts',
});

const AsyncAwait = () => {
  const [post, setPost] = useState(null);

  useEffect(() => {
    async function getPost() {
      const response = await client.get('/1');
      setPost(response.data);
    }
    getPost();
  }, []);

  async function deletePost() {
    await client.delete('/1');
    alert('Post deleted!');
    setPost(null);
  }

  if (!post) return 'No post!';

  return (
    <div>
      <h1>{post.title}</h1>
      <p>{post.body}</p>
      <button onClick={deletePost}>Delete Post</button>
    </div>
  );
};

export default AsyncAwait;
App.jsx
import './App.css';
import AsyncAwait from './AsyncAwait';

function App() {
  return (
    <>
      <AsyncAwait />
    </>
  );
}

export default App;
However in useEffect, there is an async function called getPost.
Making it async allows us to use the await keword to resolve the GET request and set that data in state on the next line without the .then() callback.
Note that the getPost function is called immediately after being created.
Additionally, the deletePost function is now async, which is a requirement to use the await keyword which resolves the promise it returns (every Axios method returns a promise to resolve).
After using the await keyword with the DELETE request, the user is alerted that the post was deleted, and the post is set to null.
As you can see, async-await cleans up the code a great deal, and we can use it with Axios very easily.
Result:
How to Create a Custom useAxios Hook
Async-await is a great way to simplify our code, but we can take this a step further.
Instead of using useEffect to fetch data when the component mounts, we could create our own custom hook with Axios to perform the same operation as a reusable function.
While you can make this custom hook yourself, there’s a very good library that gives you a custom useAxios hook called use-axios-client.
First, install the package:
npm install use-axios-clientTo use the hook itself, import useAxios from use-axios-client at the top of the component.
Because we no longer need useEffect, we can remove the React import:
import { useAxios } from "use-axios-client";

export default function App() {
  const { data, error, loading } = useAxios({
    url: "https://jsonplaceholder.typicode.com/posts/1"
  });

  if (loading || !data) return "Loading...";
  if (error) return "Error!";

  return (
    <div>
      <h1>{data.title}</h1>
      <p>{data.body}</p>
    </div>
  )
}
Now we can call useAxios at the top of the app component, pass in the URL we want to make a request to, and the hook returns an object with all the values we need to handle the different states: loading, error and the resolved data.
In the process of performing this request, the value loading will be true. If there’s an error, you will want to display that error state. Otherwise, if you have the returned data, you can display it in the UI.
The benefit of custom hooks like this is that it really cuts down on code and simplifies it overall.
If you are looking for even simpler data fetching with Axios, try out a custom useAxios hook like this one.
Conclusion
This article explained everything about Axios library. We have discussed some useful operations such as fetching the data, posting the data, updating the data and deleting the data in Axios.
Once you will start working on React, you will have to use this library to communicate with the database server. So it is important to make a practice of it and understand how things work in Axios.
Thanks for Reading 🌟🎉
It’s great to see that you have enjoyed the article. Please, let me know what you think in the comment section.


Add comment