
Robots.txt is a simple yet significant file that can determine the fate of your website in search engine result pages (SERPs). Which is why it’s important to get a deeper understanding of how robots.txt works.
By understanding the basics, you will be able to create the perfect robots.txt file that makes it easier for search engines to crawl and index your pages.
What is a robots.txt file?
Robots.txt is a file in text form that instructs bot crawlers to index or not index certain pages. It is also known as the gatekeeper for your entire site.
Bot crawlers’ first objective is to find and read the robots.txt file, before accessing your sitemap or any pages or folders.
A basic robots.txt file might look something like this:
User-Agent: *
Disallow:

Sitemap: https://www.example.com/sitemap_index.xml
The location of your robots.txt file is also important because all bots will look for www.yourdomain.com/robots.txt.
If they don’t find anything there, they will assume that the site does not have a robots.txt file and index everything. The file must be an ASCII or UTF-8 text file. It is also important to note that rules are case-sensitive.
How to create a robots.txt file
Implementing the use of a robots.txt file is really quite simple and can be done in just a few steps.
- The first step is to actually create your robots.txt file. This can be achieved by creating a file called “robots.txt” with a simple text editor.
- Next, define your parameters within the robots.txt file.
- Upload your robots.txt file to your website’s root directory. Now whenever a search engine crawls your site, it will check your robots.txt file first to determine if there are sections of the website which shouldn’t be crawled.
Robots.txt syntax
A robots.txt file consists of one or more blocks of directives, each starting with a user-agent line.
The “user-agent” is the name of the specific spider it addresses. You can either have one block for all search engines, using a wildcard for the user-agent, or particular blocks for particular search engines.
A search engine spider will always pick the block that best matches its name. So here is an example of a blocks which look like this:
User-agent: *
Disallow: /

User-agent: Googlebot
Disallow:

User-agent: bingbot
Disallow: /not-for-bing/
Directives like Allow and Disallow should not be case-sensitive, so it’s up to you to write them in lowercase or capitalize them.
The values are case-sensitive so /photo/ is not the same as /Photo/. We like to capitalize directives because it makes the file easier (for humans) to read.
The user-agent directive
The first bit of every block of directives is the user-agent, which identifies a specific spider.
Most search engines have multiple spiders. They will use a specific spider for their normal index, ad programs, images, videos, etc.
Search engines always choose the most specific block of directives they can find. Suppose you have three sets of directives: one for *, one for Googlebot and one for Googlebot-News.
If a bot comes by whose user-agent is Googlebot-Video, it would follow the Googlebot restrictions. A bot with the user-agent Googlebot-News would use the more specific Googlebot-News directives.
The disallow directive
The second line in any block of directives is the Disallow line. You can have one or more of these lines, specifying which parts of the site the specified spider can’t access.
An empty Disallow line means you’re not disallowing anything so that a spider can access all sections of your site.
The example below would block all search engines that “listen” to robots.txt from crawling your site.
User-agent: *
Disallow: /
The example below would allow all search engines to crawl your entire site by dropping a single character.
User-agent: *
Disallow:
The example below would block Google from crawling the Photo directory on your site – and everything in it.
User-agent: googlebot
Disallow: /Photo
This means all the subdirectories of the /Photo directory would also not be spidered. It would not block Google from crawling the /photo directory, as these lines are case-sensitive.
This would also block Google from accessing URLs containing /Photo, such as /Photography/.
How to use wildcards/regular expressions
Officially the robots.txt standard doesn’t support regular expressions or wildcards; however, all major search engines understand it. This means you can use lines like this to block groups of files:
Disallow: /*.php
Disallow: /copyrighted-images/*.jpg
In the example above, * is expanded to whatever filename it matches. Note that the rest of the line is still case-sensitive, so the second line above will not block a file called /copyrighted-images/example.JPG from being crawled.
Some search engines, like Google, allow for more complicated regular expressions, but be aware that other search engines might not understand this logic.
The most useful feature this adds is the $, which indicates the end of a URL. In the following example, you can see what this does:
Disallow: /*.php$This means /index.php can’t be indexed, but /index.php?p=1 could be. Of course, this is only useful in very specific circumstances and pretty dangerous: it’s easy to unblock things you didn’t want to.
Non-standard robots.txt crawl directives
As well as the Disallow and User-agent directives, there are a couple of other crawl directives you can use. All search engine crawlers do not support these directives, so make sure you know their limitations.
The allow directive
While not in the original “specification,” there was talk very early on of an allow directive. Most search engines seem to understand it, and it allows for simple and very readable directives like this:
Disallow: /wp-admin/
Allow: /wp-admin/admin-ajax.php
The only other way of achieving the same result without an allow directive would have been to specifically disallow every single file in the wp-admin folder.
The crawl-delay directive
Crawl-delay is an unofficial addition to the standard, and not many search engines adhere to it. At least Google and Yandex don’t use it, with Bing being unclear.
In theory, as crawlers can be pretty crawl-hungry, you could try the crawl-delay direction to slow them down.
A line like the one below would instruct those search engines to change how frequently they will request pages on your site.
crawl-delay: 10Do take care when using the crawl-delay directive. By setting a crawl delay of ten seconds, you only allow these search engines to access 8,640 pages a day.
This might seem plenty for a small site, but it isn’t very much for large sites. On the other hand, if you get next to no traffic from these search engines, it might be a good way to save some bandwidth.
The sitemap directive for XML Sitemaps
Using the sitemap directive, you can tell search engines – Bing, Yandex, and Google – where to find your XML sitemap.
You can, of course, submit your XML sitemaps to each search engine using their webmaster tools.
Also Read: Set Up Google Search Console
We strongly recommend you do so because webmaster tools will give you a ton of information about your site. If you don’t want to do that, adding a sitemap line to your robots.txt is a good quick alternative.
Also Read: Bing Webmaster Tools – Beginners Tutorial
For Example:
Sitemap: https://hello-sunil.in/sitemap_index.xml

User-agent: *
Disallow: /wp-admin/
Allow: /wp-admin/admin-ajax.php
Robots.txt Examples
Example – 1
This example instructs all search engine robots to not index any of the website’s content. This is defined by disallowing the root / of your website.
User-agent: *
Disallow: /
Example – 2
This example achieves the opposite of the previous one. In this case, the directives are still applied to all user agents, however there is nothing defined within the Disallow directive, meaning that everything can be indexed.
User-agent: *
Disallow:
Example – 3
This example displays a little more granularity pertaining to the directives defined. Here, the directives are only relevant to Googlebot.
More specifically, it is telling Google not to index a specific page: your-page.html
User-agent: Googlebot
Disallow: /your-page.html
Example – 4
This example uses both the Disallow and Allow directives. The directory images is disallowed to be indexed by all search bots however, by defining Allow: /images/logo.png, we can override the Disallow directive for a particular file, in this case logo.png.
User-agent: *
Disallow: /images
Allow: /images/logo.png
Example – 5
The final example is a use-case where JS, CSS, PNG files within the demo directory are allowed to be indexed by the web crawler, while all other files are not. The * before the filetype extension indicates that all files with this extension are allowed.
User-agent: *
Allow: /demo/*.js
Allow: /demo/*.css
Allow: /demo/*.png
Disallow: /demo/
Few other examples:
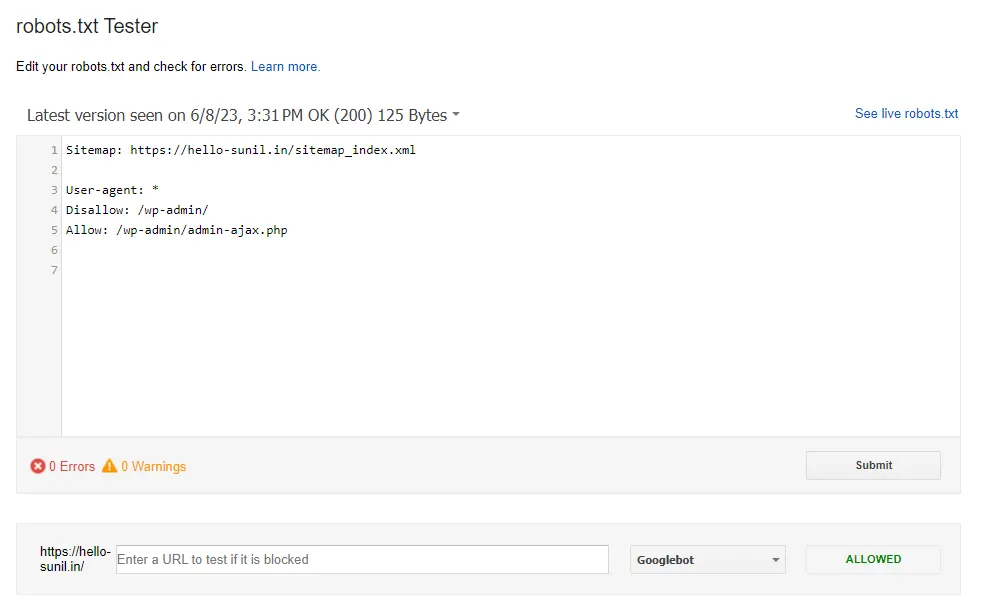
Validate your robots.txt
Various tools can help you validate your robots.txt, but when it comes to validating crawl directives, we always prefer to go to the source.
Google has a robots.txt testing tool in its Google Search Console (Old version), and we would highly recommend using that:
Conclusion
There are many reasons for having a robots.txt file including:
- You don’t want search bots to index particular content,
- Your site isn’t live yet,
- You want to specify which search bots can index content, etc.
However, it is not always necessary to have a robots.txt file. If you do not want to instruct search bots on how to crawl your website, you simply do not need a robots.txt file.
Alternatively, in the case that you do, simply adding the file to the site’s root directory and accessing it via https://example.com/robots.txt will allow you to easily customize how web crawlers will scan your site.
Be aware that when creating a robots.txt file you are not blocking any resources that the search bots need in order to properly index your content.
Resource
- The ultimate guide to robots.txt
- Introduction to robots.txt – Google Search Central
- Overview of Google crawlers and fetchers – Google Search Central
- Google Robots.txt Parser and Matcher Library


Add comment