
Looking to get started with Git and GitHub? Do you need to collaborate with a team? Are you working on a project?
OR,
…do you really just want to contribute to your first open source project?
If you say YES, then you are at right place.
First of all, GitHub is not git. Many people used to get confused with these two.
So, the question will arise in your mind i.e. What is Git and GitHub? What is the difference between Git and GitHub?
To answer these questions, in this article we will cover the fundamentals of Git and GitHub.
Therefore, this article aims at providing a way for beginners as well as those looking for a refresher to become confident with Git and GitHub as fast as possible without missing many relevant details.
What is Git?
Git is an open source distributed version control system for tracking changes in computer files and co-ordinating work on those files among multiple people.
Git was developed by the creator of Linux, Linus Torvalds for Linux kernel development. It is distributed under the terms of the General Public License (GNU) and available with almost every Linux distributions.
It is primarily used for source-code management but it can also be used to keep track of changes in any set of files. For example, when you edit a file, Git can help you determine exactly:
- What changed
- Who changed it and,
- What’s the purpose of changing
What is GitHub?
GitHub is a code hosting platform for version control and collaboration. It lets you and others work together on projects from anywhere.
GitHub is built on top of Git to give your teams another level of project organization, which includes issue tracking, code reviewing, and much more.
In short, the difference between Git and GitHub:
Git is the tool, and GitHub is a website for hosting projects that use Git.
So let’s dig into the basics first. The first thing you need to do is install Git on your computer.
❗Important Notice
Everything in this tutorial is based on the command line. Please make sure you have prior command line experience. Here’s a tutorial to get you started: Learn Basic Linux Commands.
How to install Git on your system
There are a lot of different ways you can use Git. But here we will be using Git on the command line. Command line is the place where you can run all Git commands.
The first thing you need to do is install Git on your system. Here we will be covering Git installation for Windows and Linux.
How to install Git on Windows
Here are the steps to follow to install Git on Windows:
Step 1: Download the latest Git for Windows.

Step 2: After your download is complete, double click on the installer. Click “Next”.

Step 3: If you need to change the installation folder, click “Browse” and select a new location. To accept the default location click on “Next”.

Step 4: To accept the default components to be installed click “Next”. Otherwise, select your desired components to be installed before clicking the “Next” button.

Step 5: This is the option to store the shortcut of the Git under the “Program Menu”. Click “Next”.

Step 6: Select the default text editor for Git (We recommend Visual Studio Code), then click “Next”.

Step 7: Adjust your “PATH” environment, then click “Next”.

Step 8: Choose which SSL/TLS library you will use for HTTPS. Then, click “Next”.

Step 9: Keep the default line ending conversion by clicking “Next”. To change the default, choose one of the two other choices before clicking “Next”.

💡 Note
It is strongly recommended that you keep the default settings for line ending conversions. Changing from the default may result in formatting problems.
Step 10: Choose the terminal emulator you will use.You can choose one from the options.
The default terminal of MYSYS2 which is a collection of GNU utilities like bash, make, gawk and grep to allow building of applications and programs which depend on traditionally UNIX tools to be present.
Or you can choose the window’s default console window (cmd.exe).

Click “Next”.
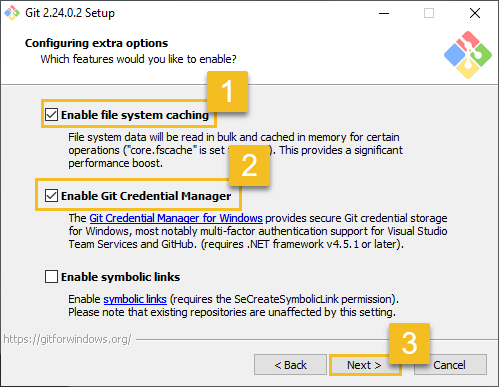
Step 11: Just go with default selections and then click “Next”.
Step 12: Click “Install”, this will just take few minutes to complete the installation as per your machine speed.

Step 13: Check “Launch Git Bash” and complete the setup by selecting “Finish” button.

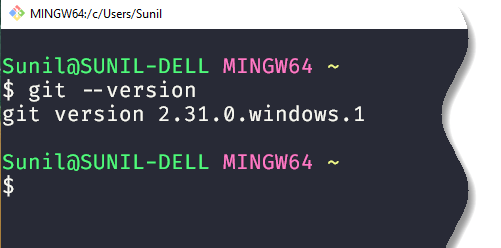
Step 14: Once you have installed Git on your Windows PC, it’s time to verify the installation.
In your terminal type in git --version to make sure Git is installed.
How to install Git on Linux
The easiest and the recommended way to install Git on Ubuntu by using apt command. Follow these steps to install Git on Ubuntu Linux:
Step 1: Just open the Terminal (Ctrl+Alt+T) and run the following command to install Git on Ubuntu Linux.
sudo apt-get install git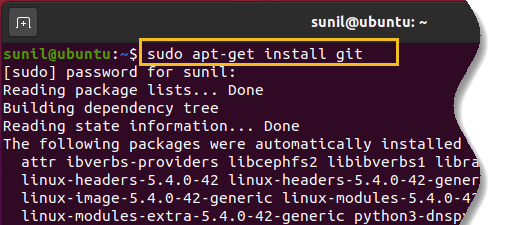
Verify the installation by typing the following command which will print the Git version:
git --version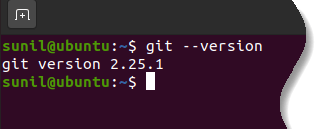
That’s it, you have successfully installed Git on your Ubuntu and you can start using it.
For more different Linux distributions, there are instructions for installing Git on this link.
How to setup GitHub account
You have successfully installed Git but remember Git only runs locally in your system (Windows/Linux). If you want to collaborate with your friends online, then you need to host your code on cloud at GitHub.


Add comment