
React context is an essential tool for every React developer to know. It lets you easily share state in your applications.
In this article, we will explore how the context API works and how to use it effectively in your React applications.
Let’s get started!
What is React Context?
React context allows us to pass down and use (consume) data in whatever component we need in our React app without using props.
In other words, React context allows us to share data (state) across our components more easily.
What Problems Does React Context Solve?
React context helps us avoid the problem of props drilling.
Props drilling is a term to describe when you pass props down multiple levels to a nested component, through components that don’t need it.
In React, passing props is a fundamental concept that enables a parent component to share data with its child components as well as other components within an application.
In many cases, passing props can be an effective way to share data between different parts of our application. But passing props down a chain of multiple components to reach a specific component can make our code overly cumbersome.
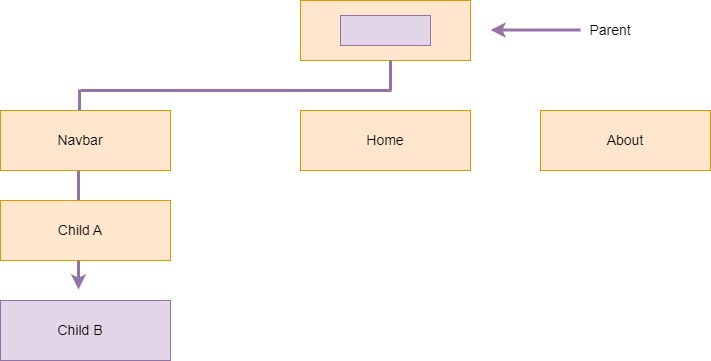
Illustration of passing props from parent to children
From the above diagram, to pass data down to the component “Child B”, we need to pass it down through all the intermediate components, even if those components don’t actually use the data themselves. This is what is referred to as “prop drilling.”
Prop drilling can make your code more difficult to read and maintain, and can also make it harder to refactor your components later on.
This is where the Context API comes in. With Context API, you can store data at the top level of the component tree and make it available to all other components that need it without passing props.
How the Context API Works
Context API allows data to be passed through a component tree without having to pass props manually at every level. This makes it easier to share data between components.
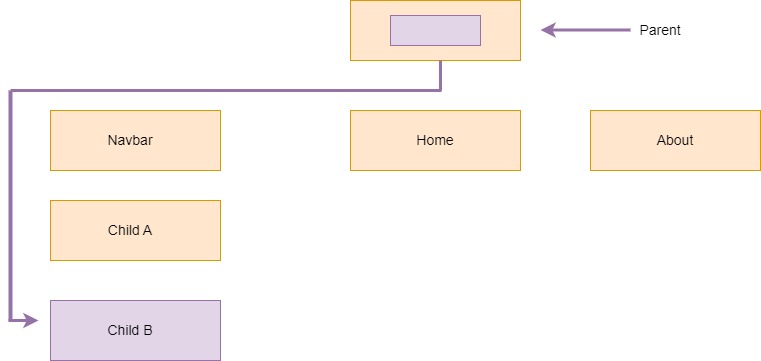
A diagram illustrating how Context API works
For example, let’s say you have a shopping app with a component that shows a user’s shopping cart, and another component that shows the user’s order history.
With Context API, you can create a “context” that holds the user’s shopping information, like their cart and order history. Then, you can use that context in both the shopping cart and the order history component, without having to pass the information down through props.
It’s like having a big box that holds all the things you need for your shopping trip. You can take things out of the box when you need them, and put them back in when you are done.
Basically, Context API consists of two main components: the context provider and the context consumer.
The provider is responsible for creating and managing the context, which holds the data to be shared between components. On the other hand, the consumer is used to access the context and its data from within a component.
In the example given, the provider will create the context that holds the user’s shopping information, while the consumer components (shopping cart and order history) will access that context to retrieve the data they need.
This avoids the need to pass the information down through props, making your code more efficient and easier to manage.
How to Get Started With the Context API
Using the context in React requires 3 simple steps: creating the context, providing the context, and consuming the context.
Does all this sound confusing? It’s simpler than you think. Let’s take a look at a very basic example.
Step 1: Create a Context Object
First, you need to create a context object using the createContext function from the ‘react’ library. This context object will hold the data that you want to share across your application.
Create a new file named MyContext.jsx in the src folder and add the following code to create a context object:
MyContext.jsx
import { createContext } from 'react';

export const MyContext = createContext("");
In the above code, we are importing createContext from React and using it to create a new context object named “MyContext”. Then, we are exporting the context object so that we can use it in other parts of our application.
Step 2: Wrap Components With a Provider
Once you have created a context object, you need to wrap the components that need access to the shared data with a Provider component.
The Provider component accepts a “value” prop that holds the shared data, and any component that is a child of the Provider component can access that shared data.
It’s important to note that the Provider component should be wrapped around the top-level component in an application to ensure that all child components have access to the shared data.
Here’s an example that demonstrates how to wrap components with a Provider in Context API:
App.jsx
// Create a parent component that wraps child
// components with a Provider

import React, { useState } from 'react';
import { MyContext } from './MyContext';
import MyComponent from './MyComponent';

function App() {
  const [text, setText] = useState('');
  return (
    <>
      <MyContext.Provider value={{ text, setText }}>
        <MyComponent />
      </MyContext.Provider>
    </>
  );
}

export default App;
In this example, we have a parent component called App.
This component has a state variable called “text”, which is initially set to an empty string. We have also defined a function called setText that can be used to update the value of text.
Inside the return statement of the App component, we have wrapped the children of this component with the provider component – MyContext.Provider.
Then we have passed an object to the value prop of the provider component that contains “text” and “setText” values.
Step 3: Consume the Context
Now that we have created the provider component, we need to consume the context in other components.
To do this, we use the useContext hook from React.
MyComponent.jsx
import React from 'react';
import { useContext } from 'react';
import { MyContext } from './MyContext';

const MyComponent = () => {
  const { text, setText } = useContext(MyContext);

  return (
    <div>
      <h1>{text}</h1>
      <button onClick={() => setText('Hello, world!')}>Click me</button>
    </div>
  );
};

export default MyComponent;
In this example, we have used the useContext hook to access the “text” and “setText” variables that were defined in the provider component.
Inside the return statement of “MyComponent”, we have rendered a paragraph element that displays the value of text.
We have also rendered a button that, when clicked, will call the setText function to update the value of text to “Hello, world!”.
Result:

And that’s it! This is how you can use the Context API in your React application.
By creating a context object, defining a provider component, and consuming the context in other components, you can share data across your application in a simple and efficient way.
Use Cases of Context API
Here are some real world use cases of Context API.
Theming: You can use Context API to store the current theme of your application and make it available to all components.
This way, whenever the user switches the theme (such as enabling dark mode), all components will be updated with the new theme.
User Authentication: You can also use Context API to store a user’s authentication status and pass it down to all the components that need it.
This way, you can easily restrict access to certain parts of your application based on the user’s authentication status.
Multilingual Support: You can store the current language of your application in the context and pass it down to all the components that need it.
This way, you can easily switch between different languages without having to pass the language down as props to all the components.
Accessing data from external sources: Finally, you can use the Context API to store data retrieved from external sources such as APIs or databases and make it available to all components.
This can simplify your code and make it easier to manage data across your application.
Overall, Context API provides a flexible and efficient way to manage state data across your application, and it can be particularly useful for managing global data that needs to be shared between multiple components.
Best Practices for Context API
As with any tool, there are best practices and common pitfalls to keep in mind when using the Context API in your projects. Here are some tips for effective use of the Context API.
Use a separate file to define your Context: It’s a good practice to define your context object in a separate file to keep your code organized and easy to maintain.
Keep Context API limited to global state management only: It’s best to use the Context API for managing state that needs to be accessed across multiple components in your application.
Avoid using it for state that only needs to be accessed within a single component, as it can lead to unnecessary complexity and performance issues.
Use context providers sparingly: While context providers can be a powerful tool for managing global state, it’s generally a good idea to use them sparingly.
Instead, consider using props to pass data down through your component tree whenever possible.
Use default values: When creating a new context, it’s a good idea to provide a default value that will be used if no provider is present. This can help prevent unexpected errors and make your code more robust.
Conclusion
React Context is an incredibly useful tool for managing state in a React application. It provides a way to share data between components without the need for prop drilling or creating a centralized store with a library like Redux.
When used correctly, React Context can simplify the management of complex state and make our code more efficient and maintainable.
Thank you for reading!


Add comment