
In this mobile-centric era, having quickly loading pages is vital to satisfy the users. Not only that, but the slow speed page’s effect has also been correlated to increase in page abandonment.
By AMP you can make your site load faster on mobile devices. Fast loading site offer better user experience and can improve site traffic. Hence in this article, we are going to discuss What is AMP? How does it work & How to setup AMP in WordPress site?
We also cover the importance of AMP in SEO as well as some of the pros and cons of this new platform.
What is AMP?
AMP, short for Accelerated Mobile Pages, was originally launched back in October 2015 by Google. The project relies on AMP HTML, a new open framework built entirely out of existing web technologies, which allows websites to build light-weight webpages.
APM offers a way to serve up a stripped down version of your current web page.
It essentially lets you create stripped-down version of your WordPress posts and pages and serve them up to mobile visitors. For those visiting from Google search, Google will even cache your AMP content to load it even faster.
When a page is served via AMP in Google it will have the AMP symbol next to it as shown on the following image:

💡 Note
You must be on a mobile device to test this. You can also use the device emulator in Chrome devtools.
What are the benefits of AMP for WordPress?
AMP provides many benefits, although it also has some potential drawbacks too. Let’s explore both sides of that coin. First up, the pros include:
💡 Note
Google has stated that AMP is not a direct ranking signal for SEO. But the AMP designation should increase your organic CTR in mobile results.
What are the drawbacks of AMP for WordPress?
On the other hand, here are the possible cons associated with using AMP on WordPress:
These are few drawbacks however, if you are looking for a quick and easy way to make sure your WordPress site posts and pages look and function great on mobile devices, AMP is still well worth considering.
In the next section, we are going to cover the method to set up AMP on WordPress by using a plugin.
How to properly setup AMP in WordPress by using a plugin
Follow this quick seven-steps to enable AMP for WordPress.
Step 1: First thing you need to do is install the free official AMP plugin from WordPress plugins repository and activate it. This is the base plugin that you will need in order for AMP to work.
For more details, see our step by step guide on how to install a WordPress plugin.

Step 2: Next, navigate to the Appearance -> AMP tab in your WordPress dashboard.

This will bring up the AMP customizer page. Once there, select the Design tab:

Here, you can customize the way your WordPress AMP site will be displayed, and preview any changes before you make your site live. You can adjust your site’s text, link, and background color.
Plus, you can select whether or not you want a light or dark color scheme for your site. Once you are happy with your changes, simply hit Publish button at the top of the screen.

AMP plugin will automatically generate AMP compatible versions of all your posts, which you can view by appending /amp/ to the end of your post URLs.
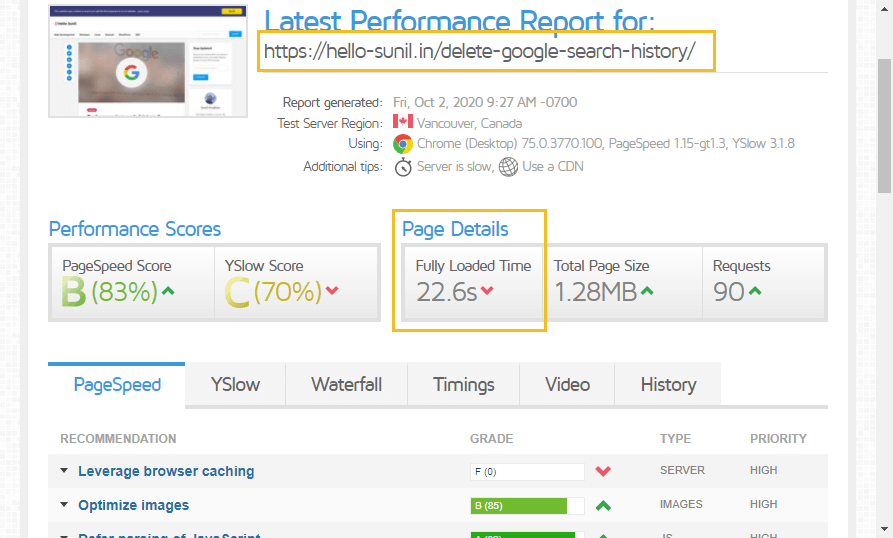
For example:
Original URL: https://hello-sunil.in/delete-google-search-history/

AMP Version URL: https://hello-sunil.in/delete-google-search-history/amp/

One more quick way to see AMP posts by clicking on WordPress header bar AMP link:

In other scenarios, if you are editing your post in WordPress then click on AMP icon to preview AMP version of your post.

Step 3: You can also set whether you want posts, pages, or both to display on WordPress AMP. To do this, simply return to the WordPress dashboard and go to AMP –> Settings:

Once there, check the boxes for posts and pages and click on Save Changes button.
Step 4: In the Analytics tab, you can enter an AMP-specific JSON version of your Google Analytics script.
💡 Note
Once you setup AMP on a WordPress site, you will want to know if it works. It is an important step so make sure to add Google Analytics to your AMP posts and pages.
This will help you track the statistics of your users: who is visiting your website, where from, and how they are interacting with it. Then you can see if AMP makes a difference for you and your mobile users or not!

In order to set your WordPress posts and pages up for Google Analytics tracking, you will first need to find your tracking ID. Log in to Google Analytics, then click the gear icon at the bottom left to bring up the Admin panel.

Once you have selected the Account and Property from their respective drop-down menus, click where is says “Tracking Info” within the Property column. From there, click “Tracking Code” to see your tracking ID — the ID should begin with UA.
Copy your tracking ID, then add the following lines of code to the Analytics code field. Make sure you replace UA-XXXXX-Y with your unique Google Analytics tracking ID.
{
  "vars": {
    "account": "UA-XXXXXXXX-Y"
  },
  "triggers": {
    "trackPageview": {
      "on": "visible",
      "request": "pageview"
    }
  }
}
Finally click on Save Changes button.
Step 5: If you want to remove WordPress branding (under footer) from base AMP plugin then navigate from your WordPress dashboard Plugins -> Editor and select AMP plugin from drop down menu.


Open the file templates/footer.php and replace it with the following code then click on Update File button.
<?php
/**
 * Footer template part.
 *
 * 🚫🚫🚫
 * DO NOT EDIT THIS FILE WHILE INSIDE THE PLUGIN! Changes You make will be lost when a new version
 * of the AMP plugin is released. You need to copy this file out of the plugin and put it into your
 * custom theme, for example. To learn about how to customize these Reader-mode AMP templates, please
 * see: https://amp-wp.org/documentation/how-the-plugin-works/classic-templates/
 * 🚫🚫🚫
 *
 * @package AMP
 */

/**
 * Context.
 *
 * @var AMP_Post_Template $this
 */
?>
<footer class="amp-wp-footer">
	<div>
		<h2><?php echo esc_html( wptexturize( $this->get( 'blog_name' ) ) ); ?></h2>
		<p style="text-align: left;"> Copyright © 2017 – 2020</p>
		<a href="#top" class="back-to-top"><?php esc_html_e( 'Back to top', 'amp' ); ?></a>
	</div>
</footer>
Step 6: Now that you have created AMP URLs for your posts and pages in WordPress, it’s also important to ensure that they are working properly. If they are not configured correctly, Google will not display them in search results.
You can cross check how your APM posts and pages are doing in Google Search by using the Google Search Console tool. In general GSC provides a way to manage all your AMP pages in one location. To do so, visit Property -> Enhancements -> AMP

GSC AMP dashboard shows you how many of your AMP posts and pages are being indexed by Google and which ones having critical issue.

If any of your AMP posts or pages from WordPress having critical issues then you can troubleshoot those issues by using the following tools.
Tool 1: AMP Validator
You can use Google AMP Validator tool to find whether your WordPress posts and pages code are AMP compliant or not. Just paste post URL and click on Validate button then it will show you validation status at the bottom.

You can also read the complete AMP checklist to create WordPress posts and pages fully AMP compliant.
This tool has also official VS code extension, Chrome extension and also available as npm package.
Tool 2: AMP Test

Go to AMP Test page and enter your WordPress post or page URL and click Test URL then note the outcome (valid/invalid).

You can also check, the preview of your post. Means how it looks when someone searches it on Google.

If your AMP WordPress post is working fine and there are no errors then feels free to submit to Google by hitting on the Submit to Google button.
Step 7: Once you have completed the above, now it’s time to see the benefits of your efforts. Run your AMP version and standard mobile version WordPress posts or pages through a page speed tool and compare the results.
You can use any page speed test tool to measure the speed such as WebPageTest or GT Metrix. But I recommends to use GT Metrix page speed test tool because this tool gives you the overall view of your WordPress site.
Standard mobile version:
AMP version:

In this case, you can clearly see AMP version of WordPress post is loading faster than normal mobile version.
Should you install AMP on your WordPress site or not?
When choosing whether to install AMP or not, you should ask yourself a few questions, including the following:
Conclusion
Even a few seconds of delay during loading could significantly reduce your site’s positioning in Google. Fortunately, as we have seen, using AMP can help you ensure that your WordPress site’s posts and pages load at lightning speed on mobile devices.
Hence, AMP for WordPress is a great way to speed up your site for your mobile visitors.
Have any other tips about using AMP with WordPress? If so we would love to hear about them below in the comments! Also, make sure to check out the official AMP roadmap.
If you found this post helpful, please share it and spread the word!


Add comment