
React Router is a third-party library that enables routing in our React apps.
In this tutorial, we are going to cover everything you need to know to get started with React Router.
Setting Up The Project
To be able to follow along, you will need to create a new React app by using Vite.
📣 Also Read: Using Vite to create a new React app
Then, add these lines of code to the file:
App.jsx
import './App.css';

function App() {
  return (
    <>
      <main>
        <nav>
          <ul>
            <li>
              <a href="/">Home</a>
            </li>
            <li>
              <a href="/about">About</a>
            </li>
            <li>
              <a href="/contact">Contact</a>
            </li>
          </ul>
        </nav>
      </main>
    </>
  );
}

export default App;
Home.jsx
import React from 'react';

const Home = () => {
  return (
    <div>
      <p>This is home page.</p>
    </div>
  );
};

export default Home;
About.jsx
import React from 'react';
const About = () => {
return (
<div>
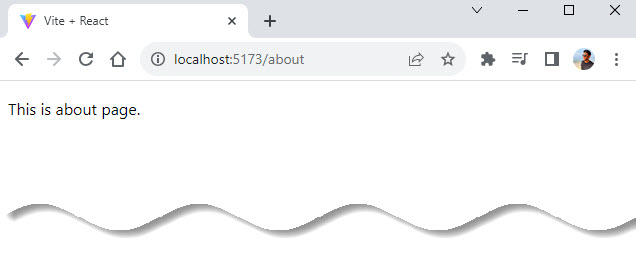
<p>This is about page.</p>
</div>
);
};
export default About;Contact.jsx
import React from 'react';

const Contact = () => {
  return (
    <div>
      <p>This is contact page.</p>
    </div>
  );
};

export default Contact;
Then, if you are ready to go, let’s start by answering an important question: what is routing?
What is Routing?
Routing is the capacity to show different pages to the user. That means the user can move between different parts of an application by entering a URL or clicking on an element.
As you may already know, by default, React comes without routing. And to enable it in our project, we need to add a library named react-router.
To install it, you will have to run the following command in your terminal:
npm install react-router-dom
Now, we have successfully installed our router, let’s start using it in the next section.
Setting Up the Router
To enable routing in our React app, we first need to import BrowserRouter from react-router-dom.
Generally you will import your router in the main.jsx page of your application and it will wrap your App component.
In the main.jsx file, enter the following:
import React from 'react';
import ReactDOM from 'react-dom/client';
import { BrowserRouter } from 'react-router-dom';
import App from './App.jsx';
import './index.css';

ReactDOM.createRoot(document.getElementById('root')).render(
  <React.StrictMode>
    <BrowserRouter>
      <App />
    </BrowserRouter>
  </React.StrictMode>
);
This should hold everything in our app where routing is needed. That means, if we need routing in our entire app, we must wrap our higher component with BrowserRouter.
A router alone doesn’t do much. So let’s add a route in the next section.
Defining Routes
The next step in React Router is to define your routes. This is generally done at the top level of your application, such as in the App component, but can be done anywhere you want.
App.jsx
import { Route, Routes } from 'react-router-dom';
import './App.css';
import Home from './Home';
import About from './About';
import Contact from './Contact';

function App() {
  return (
    <Routes>
      <Route path="/" element={<Home />} />
      <Route path="/about" element={<About />} />
      <Route path="/contact" element={<Contact />} />
    </Routes>
  );
}

export default App;
Defining routes is as simple as defining a single Route component for each route in your application and then putting all those Route components in a single Routes component.
Whenever your URL changes React Router will look at the routes defined in your Routes component and it will render the content in the element prop of the Route that has a path that matches the URL.
In the above example if our URL was /about then the About component would be rendered.
The nice thing about React Router is that when you navigate between pages it will only refresh the content inside your Routes component. All the rest of the content on your page will stay the same which helps with performance and user experience.
💡 Routes, Route, path, element
Routes acts as a container for all the individual routes that will be created in our app.Route is used to create a single route. It takes in two attributes:path, which specifies the URL path of the desired component. You can call this pathname whatever you want. Above, you will notice that the first pathname is a backslash (/). Any component whose pathname is a backslash will get rendered first whenever the app loads for the first time. This implies that the Home component will be the first component to get rendered.
All we have done now is define our routes and their paths, and attach them to their respective components.
Handling Navigation
The final step to React Router is handling navigation. Normally in an application you would navigate with anchor tags, but React Router uses its own custom Link component to handle navigation.
Link
This Link component is just a wrapper around an anchor tag that helps ensure all the routing and conditional re-rendering is handled properly so you can use it just like your would a normal anchor tag.
App.jsx
import { Route, Routes, Link } from 'react-router-dom';
import './App.css';
import Home from './Home';
import About from './About';
import Contact from './Contact';
function App() {
return (
<>
<nav>
<ul>
<li>
<Link to="/">Home</Link>
</li>
<li>
<Link to="/about">About</Link>
</li>
<li>
<Link to="/contact">Contact</Link>
</li>
</ul>
</nav>
<Routes>
<Route path="/" element={<Home />} />
<Route path="/about" element={<About />} />
<Route path="/contact" element={<Contact />} />
</Routes>
</>
);
}
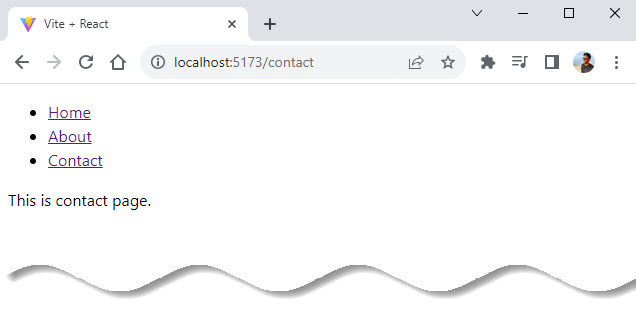
export default App;In our example we added three links to the home, about and contact page.
You will also notice that we used the to prop to set the URL instead of the href prop you are used to using with an anchor tag.
This is the only difference between the Link component and an anchor tag and is something that you need to remember as it is an easy mistake to accidentally use an href prop instead of the to prop.
Another thing to note about our new code is that the nav we are rending at the top of our page is outside of our Routes component which means when we change pages this nav section will not be re-rendered as only the content in the Routes component will change when the URL changes.
💡 Link Component Props
to: String or object which specifies the path namereplace: Replaces the pathname in the history stack with newinnerRef: Passes ref to the element rendered by the componentNavLink
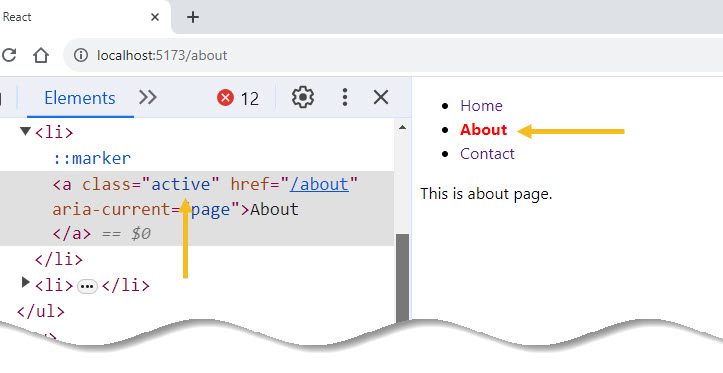
NavLink component works exactly the same as the Link component, but it is specifically for showing active states on links, for example in nav bars.
We have three methods to style our link when it is active.
- Apply style in external CSS
- Using inline style by
styleprop - Using
className
Method 1: Apply style in external CSS
By default if the to property of a NavLink is the same as the URL of the current page the link will have an active class added to it which you can use for styling.
App.jsx
import { Route, Routes, NavLink } from 'react-router-dom';
import './App.css';
import Home from './Home';
import About from './About';
import Contact from './Contact';

function App() {
  return (
    <>
      <nav>
        <ul>
          <li>
            <NavLink to="/">Home</NavLink>
          </li>
          <li>
            <NavLink to="/about">About</NavLink>
          </li>
          <li>
            <NavLink to="/contact">Contact</NavLink>
          </li>
        </ul>
      </nav>

      <Routes>
        <Route path="/" element={<Home />} />
        <Route path="/about" element={<About />} />
        <Route path="/contact" element={<Contact />} />
      </Routes>
    </>
  );
}

export default App;
App.css
nav ul li a {
	margin-right: 16px;
	text-decoration: none;
}

nav ul li a.active {
	text-decoration: none;
	font-weight: bold;
	color: red;
}
💡 NavLink Component Props
to, replace, innerRef same as the Link ComponentclassName: Specifies the CSS class name you want to apply to the element when activeisActive: Returns boolean value whether the link is active or notstyle: To apply inline CSS.end: Match the pathname precisely with the URLMethod 2: Using inline style by style prop
The style prop works like a normal style prop, but you can also pass it a function to customize the styles applied based on the active state of the link.
App.jsx
import { Route, Routes, NavLink } from 'react-router-dom';
import Home from './Home';
import About from './About';
import Contact from './Contact';

function App() {

  return (
    <>
      <nav>
        <ul>
          <li>
            <NavLink
              to="/"
              style={({ isActive }) => ({
                color: isActive ? 'red' : 'black',
                fontWeight: isActive ? 'bold' : 'normal',
                textDecoration: isActive ? 'none' : 'none',
              })}
            >
              Home
            </NavLink>
          </li>
          <li>
            <NavLink
              to="/about"
              style={({ isActive }) => ({
                color: isActive ? 'red' : 'black',
                fontWeight: isActive ? 'bold' : 'normal',
                textDecoration: isActive ? 'none' : 'none',
              })}
            >
              About
            </NavLink>
          </li>
          <li>
            <NavLink
              to="/contact"
              style={({ isActive }) => ({
                color: isActive ? 'red' : 'black',
                fontWeight: isActive ? 'bold' : 'normal',
                textDecoration: isActive ? 'none' : 'none',
              })}
            >
              Contact
            </NavLink>
          </li>
        </ul>
      </nav>

      <Routes>
        <Route path="/" element={<Home />} />
        <Route path="/about" element={<About />} />
        <Route path="/contact" element={<Contact />} />
      </Routes>
    </>
  );
}

export default App;
Or you can store inline style in a variable then use it in style prop.
📣 Also Read: How To Style And Write CSS In React
App.jsx
import { Route, Routes, NavLink } from 'react-router-dom';
import Home from './Home';
import About from './About';
import Contact from './Contact';

function App() {
  const navLinkStyles = ({ isActive }) => {
    return {
      fontWeight: isActive ? 'bold' : 'normal',
      textDecoration: isActive ? 'none' : 'none',
      color: isActive ? 'red' : 'black',
    };
  };
  return (
    <>
      <nav>
        <ul>
          <li>
            <NavLink to="/" style={navLinkStyles}>
              Home
            </NavLink>
          </li>
          <li>
            <NavLink to="/about" style={navLinkStyles}>
              About
            </NavLink>
          </li>
          <li>
            <NavLink to="/contact" style={navLinkStyles}>
              Contact
            </NavLink>
          </li>
        </ul>
      </nav>

      <Routes>
        <Route path="/" element={<Home />} />
        <Route path="/about" element={<About />} />
        <Route path="/contact" element={<Contact />} />
      </Routes>
    </>
  );
}

export default App;
Output:
Method 3: Using className
The className prop works like a normal className, but you can also pass it a function to customize the class names applied based on the active and state of the link.
App.jsx
import { Route, Routes, NavLink } from 'react-router-dom';
import './App.css';
import Home from './Home';
import About from './About';
import Contact from './Contact';

function App() {
  return (
    <>
      <nav>
        <ul>
          <li>
            <NavLink
              to="/"
              className={({ isActive }) =>
                isActive ? 'activeLink' : 'normalLink'
              }
            >
              Home
            </NavLink>
          </li>
          <li>
            <NavLink
              to="/about"
              className={({ isActive }) =>
                isActive ? 'activeLink' : 'normalLink'
              }
            >
              About
            </NavLink>
          </li>
          <li>
            <NavLink
              to="/contact"
              className={({ isActive }) =>
                isActive ? 'activeLink' : 'normalLink'
              }
            >
              Contact
            </NavLink>
          </li>
        </ul>
      </nav>

      <Routes>
        <Route path="/" element={<Home />} />
        <Route path="/about" element={<About />} />
        <Route path="/contact" element={<Contact />} />
      </Routes>
    </>
  );
}

export default App;
App.css
.activeLink {
	text-decoration: none;
	font-weight: bold;
	color: red;
}

.normalLink {
	text-decoration: none;
	color: black;
}
Output:
Navigating Programmatically
Frequently when you are building an application in React, you will need to route a user to a new page after a click event or action.
For this React Router provides the useNavigate hook to handle such situations where programmatic navigation is necessary.
In this example, we will use useNavigate() hook to navigate to the about page and to go back to the home page.
Home.jsx
import React from 'react';
import { useNavigate } from 'react-router-dom';
import './App.css';

const Home = () => {
  const navigate = useNavigate();
  return (
    <div>
      <p>This is home page.</p>
      <button onClick={() => navigate('/about')}>About</button>
    </div>
  );
};

export default Home;
About.jsx
import React from 'react';
import { useNavigate } from 'react-router-dom';
import './App.css';

const About = () => {
  const navigate = useNavigate();

  return (
    <div>
      <p>This is about page.</p>
      <button onClick={() => navigate(-1)}>Go Back Home</button>
    </div>
  );
};

export default About;
Kindly note here, the numerical argument has passed to move the history stack pointer. This will allow you to simulate hitting the forward/back button.
navigate(-1) // Go back one page in history
navigate(-3) // Go back three pages in history
navigate(1) // Go forward one page in history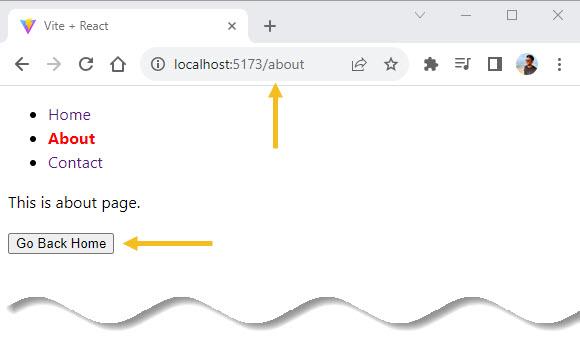
App.jsx
import { Route, Routes, NavLink } from 'react-router-dom';
import './App.css';
import Home from './Home';
import About from './About';
import Contact from './Contact';

function App() {
  return (
    <>
      <nav>
        <ul>
          <li>
            <NavLink to="/">Home</NavLink>
          </li>
          <li>
            <NavLink to="/about">About</NavLink>
          </li>
          <li>
            <NavLink to="/contact">Contact</NavLink>
          </li>
        </ul>
      </nav>

      <Routes>
        <Route path="/" element={<Home />} />
        <Route path="/about" element={<About />} />
        <Route path="/contact" element={<Contact />} />
      </Routes>
    </>
  );
}

export default App;
App.css
nav ul li a {
	margin-right: 16px;
	text-decoration: none;
}

nav ul li a.active {
	text-decoration: none;
	font-weight: bold;
	color: red;
}
If you want to make your code looks more clean on click event then:
Home.jsx
import React from 'react';
import { useNavigate } from 'react-router-dom';
import './App.css';

const Home = () => {
  const navigate = useNavigate();
  const navigateToAbout = () => {
    navigate('/about');
  };
  return (
    <div>
      <p>This is home page.</p>
      <button onClick={navigateToAbout}>About</button>
    </div>
  );
};

export default Home;
About.jsx
import React from 'react';
import { useNavigate } from 'react-router-dom';
import './App.css';

const About = () => {
  const navigate = useNavigate();
  const navigateToHome = () => {
    navigate('/');
  };

  return (
    <div>
      <p>This is about page.</p>
      <button onClick={navigateToHome}>Go Back Home</button>
    </div>
  );
};

export default About;
The output will be same as before.
So useNavigate hook use cases would be:
- Go to the previous or next pages
- Redirect user to a specific URL
No Match Route (404 Page)
Every Website needs a 404 page if the URL does not exist. This may be because of user clicked on a broken link or they have mistyped a URL.
We can provide useful navigation or links on the 404 page which helps the user continue on the website.
We have two methods to set up 404 page in React.
- 404 page using a wildcard path with an asterisk(
*) - Redirect to the sitename.com/404 path
Method 1: 404 Page Using a Wildcard Path With an Asterisk(*)
Show Page Not Found content in the requested URL is the best way to handle 404 requests.
For this use wildcard path with an asterisk(*) at the end of the routes. Using * renders the PageNotFound component for all the URLs not specified in the routes.
Let us explain with below sample code.
PageNotFound.jsx
import React from 'react'

const PageNotFound = () => {
	return (
		<div>PageNotFound</div>
	)
}

export default PageNotFound
App.jsx
import { Route, Routes, NavLink } from 'react-router-dom';
import './App.css';
import Home from './Home';
import About from './About';
import Contact from './Contact';
import PageNotFound from './PageNotFound';

function App() {
  return (
    <>
      <nav>
        <ul>
          <li>
            <NavLink to="/">Home</NavLink>
          </li>
          <li>
            <NavLink to="/about">About</NavLink>
          </li>
          <li>
            <NavLink to="/contact">Contact</NavLink>
          </li>
        </ul>
      </nav>

      <Routes>
        <Route path="/" element={<Home />} />
        <Route path="/about" element={<About />} />
        <Route path="/contact" element={<Contact />} />
        <Route path="*" element={<PageNotFound />} />
      </Routes>
    </>
  );
}

export default App;
Output:
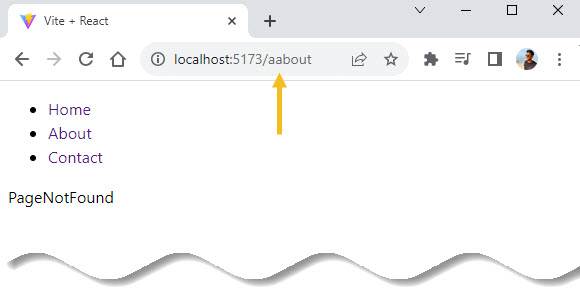
If a user navigates to /about, the corresponding component that we set for the routes, will get rendered.
However, if a user navigates to any non existing URLs, the PageNotFound component will be rendered. Because we have given <Route path=”*” element={<PageNotFound />} /> at the end of routes to catch no matching route in the routes list.
Method 2: Redirect User to a Specific URL
Here we are redirecting the user to another page(in the below example we are redirecting to the home page) instead of rendering the PageNotFound component.
For this, we are using Navigate component imported from the react-router-dom. Given below is a sample code for implementing this.
App.jsx
import { Route, Routes, NavLink, Navigate } from 'react-router-dom';
import './App.css';
import Home from './Home';
import About from './About';
import Contact from './Contact';


function App() {
  return (
    <>
      <nav>
        <ul>
          <li>
            <NavLink to="/">Home</NavLink>
          </li>
          <li>
            <NavLink to="/about">About</NavLink>
          </li>
          <li>
            <NavLink to="/contact">Contact</NavLink>
          </li>
        </ul>
      </nav>

      <Routes>
        <Route path="/" element={<Home />} />
        <Route path="/about" element={<About />} />
        <Route path="/contact" element={<Contact />} />
				<Route path="*" element={<Navigate to="/404" />} />
      </Routes>
    </>
  );
}

export default App;
Conclusion
React Router is a massive library with tons of amazing features which is the reason it is the go-to routing library for most people. In this tutorial we have covered the most basic uses of React Router.
In the upcoming React Router tutorial we will cover more advance topics such as nested routing, protected routing, dynamic routing, URL params and more.
As always, ask questions, leave feedback, and keep on coding!✌️
Similar articles you may like
- Using Vite to create a new React app
- React Components – A Theoretical View
- JSX in React – For Absolute Beginners
- The Guide to Nested Routes with React Router


Add comment