
As a React developer, you will usually be working on styling your React application.
In this detailed tutorial on CSS in React, we will walk you through the various methodologies through which you can style the React application with CSS.
So, let’s get started!
How to Style Your React App
Styling is one of the most important aspects of the React application. There are five distinct ways in which you can style and write CSS in React:
- Inline Styles
- Using external Stylesheet
- SASS in React
- CSS Modules
- CSS-in-JS
Inline Styles
Inline CSS is the widely preferred but less recommended way to style your website. This is not just in the case of React. Even with raw HTML, writing inline CSS makes it difficult to edit in the future.
📣 Also Read: CSS Styles : Inline, External and Internal
Inline styling is the best way to try different CSS properties. One key point to remember is that inline styles have got more priority, and they will overwrite any other styles given to them in any manner.
📣 Also Read: What is CSS Specificity and How Does it Work?
Writing Inline CSS in React and plain HTML has a small difference. In HTML, you will write your style using the style attribute followed by = and then CSS properties enclosed by double quotes or single quotes.
<body>
    <h1 style="color: blue">Hello world!</h1>
</body>
In React, inline styles are not specified as a string. Instead they are specified with an object whose key is the camelCase version of the style name, and whose value is the style’s value, usually a string.
Also we will use double curly braces {{ }} instead of quotes “ ”.
App.jsx
function App() {
  return (
    <div>
      <h1
        style={{
          lineHeight: 1.5,
          fontWeight: 300,
          marginBottom: '25px',
          fontSize: '1.375rem',
          color: 'blue',
        }}
      >
        Hello world!
      </h1>
      <p
        style={{
          marginBottom: '0',
          fontWeight: 600,
          fontSize: '1rem',
        }}
      >
        I am Sunil.
      </p>
    </div>
  );
}

export default App;
Despite a few quick benefits, inline styles are only an acceptable choice for very small applications. The difficulties with inline styles become apparent as your code base grows even slightly.
As the code example above shows, even a small component like this becomes very bulky if all the styles are inline.
One quick trick however is to put inline styles into reusable variables, which can be stored in a separate file:
App.jsx
const styles = {
  heading: {
    lineHeight: 1.5,
    fontWeight: 300,
    marginBottom: '25px',
    fontSize: '1.375rem',
    color: 'blue',
  },
  para: {
    marginBottom: '0',
    fontWeight: 600,
    fontSize: '1rem',
  },
};

function App() {
  return (
    <div>
      <h1 style={styles.heading}>Hello world!</h1>
      <p style={styles.para}>I am Sunil.</p>
    </div>
  );
}

export default App;
Despite this improvement, inline styles do not have a number of essential features that any simple CSS stylesheet could provide.
👍 Pros:
- Quickest way to write styles
- Good for prototyping (write inline styles then move to stylesheet)
- Has great preference (can override styles from a stylesheet)
👎 Cons:
- Does not scale well
- Lots of inline styles make JSX unreadable
- It does not provide browser cache advantages
- You can not use basic CSS features like animations, selectors, pseudo-element, pseudo-classes, media queries etc
External CSS
This is one of the preferred ways of writing CSS in React. Instead of writing Inline CSS we separate the CSS part into a separate file which is simply imported into the React component.
The advantage of external stylesheets is that we get complete control over the CSS properties which is impossible with inline CSS in React.
Here all we have to do is create a filename with a .css extension and import it into the React file.
Now we can give className and id to point which styles should point to which element. It is important to note that the class attribute is used in HTML, whereas className is used in React.
App.jsx
import './App.css';

function App() {
  return (
    <div>
      <h1 className="heading">Hello world!</h1>
      <p className="para">I am Sunil.</p>
    </div>
  );
}

export default App;
App.css
.heading {
	line-height: 1.5;
	font-weight: 300;
	margin-bottom: 25px;
	font-size: 1.375rem;
	color: blue;
}

.para {
	margin-bottom: 0;
	font-weight: 600;
	font-size: 1rem;
}
One thing that we should focus on is the naming convention for classes and IDs. There is a good chance that if we are writing complex web UI, we may unknowingly create multiple className with the same name.
A naming convention called BEM is the answer to the problem listed above!
📣 Also Read: BEM for CSS : A Quick Intro
👍 Pros:
- Gives us all of the tools of modern CSS (variables, advanced selectors, new pseudo-classes, etc.)
- Helps us clean up our component files from inline styles
👎 Cons:
- Requires more typing and boilerplate than other CSS libraries (i.e. SASS)
- Must use a reliable naming convention to ensure styles don’t conflict
SASS in React
SASS is an acronym that stands for: Syntactically Awesome Style Sheets.
📣 Also Read: How to setup and use SASS in VS Code
SASS gives us some powerful tools, many of which don’t exist in normal CSS stylesheets. It includes features like interpolation, mixins, and nesting.
Since this is not regular CSS, it needs to be compiled from SASS into plain CSS. To do so in our React projects, you can use a library like node-sass.
To start using SASS files, you can install node-sass with npm:
npm install node-sassApp.scss
.heading {
	line-height: 1.5;
	font-weight: 300;
	margin-bottom: 25px;
	font-size: 1.375rem;
	color: blue;
}

.para {
	margin-bottom: 0;
	font-weight: 600;
	font-size: 1rem;
}
Use Live Sass Compiler extension in VS Code which will auto generate .css code for you.
App.css
.heading {
  line-height: 1.5;
  font-weight: 300;
  margin-bottom: 25px;
  font-size: 1.375rem;
  color: blue;
}

.para {
  margin-bottom: 0;
  font-weight: 600;
  font-size: 1rem;
}/*# sourceMappingURL=App.css.map */
App.jsx
import './App.css';

function App() {
  return (
    <div>
      <h1 className="heading">Hello world!</h1>
      <p className="para">I am Sunil.</p>
    </div>
  );
}

export default App;
👍 Pros:
- Includes many dynamic CSS features like extending, nesting, and mixins
- CSS styles can be written with much less boilerplate over plain CSS
👎 Cons:
- Like plain CSS, styles are global and not scoped to any one component
- SASS often requires setup, such as installing the Node library
node-sass
CSS Modules
CSS Modules are another slight alternative to something like CSS or SASS. What is great about CSS modules is that they can be used with either normal CSS or SASS.
A CSS Module is a CSS file with a .module.css extension in which all class names are scoped locally by default.
CSS class names are scoped globally by default. This can lead to conflict, especially in large stylesheets, one style can override another. This is the problem CSS Modules solves. CSS classes are only available within the component where they are used.
One huge advantage of the CSS modules is that you would not witness any className conflicts.
CSS Modules let you write styles in CSS files but consume them as JavaScript objects for additional processing and safety.
While working with CSS in React, you can use CSS Modules by creating a [name].module.css file and import it into the specific React component file.
App.module.css
.heading {
  line-height: 1.5;
  font-weight: 300;
  margin-bottom: 25px;
  font-size: 1.375rem;
  color: blue;
}

.para {
  margin-bottom: 0;
  font-weight: 600;
  font-size: 1rem;
}
App.jsx
import styles from './App.module.css';

function App() {
  return (
    <div>
      <h1 className={styles.heading}>Hello world!</h1>
      <p className={styles.para}>I am Sunil.</p>
    </div>
  );
}

export default App;
What is interesting to note if we look at the code above is that CSS Modules are written just like normal CSS, but are imported and used as if it were created as objects (inline styles).
Here, you can see we have our App.jsx file and App.module.css file. Though this seems normal, the fun starts when you check it in the browser.
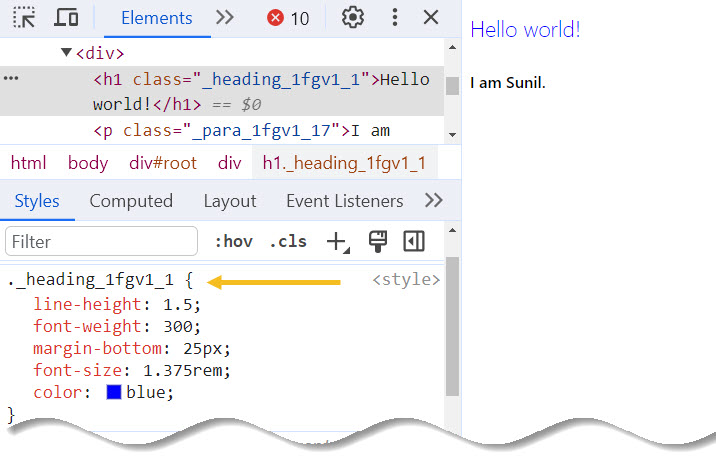
As you can see, we didn’t specify a class name in the CSS. Here our class name is ._heading_1fgv1_1 which is further transformed into a Unique Identifier. This will remove any chances of name collision in the React App.
Remember that the main purpose of CSS modules are to make CSS classes locally scoped and avoid conflicts in naming.
Therefore, CSS Modules are best to use over CSS and SASS to make sure classes don’t conflict and to write predictable styles that only apply to one or another component.
👍 Pros:
- Unique, generated class names ensure no style conflict
- Can be used with SASS / CSS
👎 Cons:
- Can be tricky to reference class names
- May be a learning curve to use CSS styles like object properties
CSS-in-JS
Similar to how React allowed us to write HTML as JavaScript with JSX, CSS-in-JS has done something similar with CSS.
CSS-in-JS allows us to write CSS styles directly in our component .jsx file.
Not only does it allow you write CSS style rules without having to make a single .css file, but these styles are scoped to individual components.
In other words, you can add, change or remove CSS without any surprises. Changing one component’s styles will not impact the styles of the rest of your application.
CSS-in-JS often makes use of a special type of JavaScript function called a tagged template literal. What’s great about this is that we can still write plain CSS style rules directly in our JavaScript.
Here’s a quick example of a popular CSS-in-JS library, Styled Components:
To start using Styled Components, you need to install it by:
npm install styled-componentsApp.jsx
import styled from 'styled-components';

const Button = styled.button`
  color: limegreen;
  border: 2px solid limegreen;
  font-size: 1em;
  margin: 1em;
  padding: 0.25em 1em;
  border-radius: 3px;

  &:hover {
    opacity: 0.9;
  }
`;

function App() {
  return (
    <div>
      <Button>Click me</Button>
    </div>
  );
}

export default App;
Output:
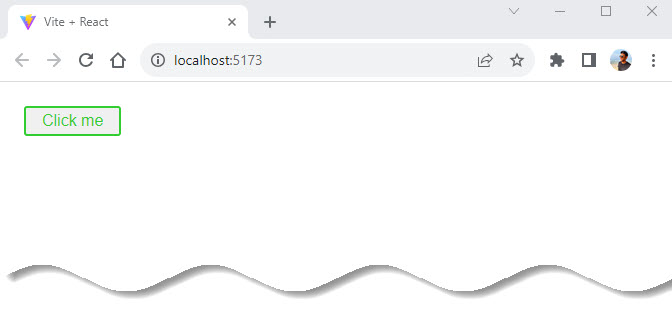
Note a few things here:
- You can write normal CSS styles, but can include nested styles and pseudo-classes (like hover).
- You can associate styles with any valid HTML element, such as the button element above (see
styled.button). - Since this is a component, can it be passed props? Yes! We can export this component and use it anywhere in our app we like, plus give it dynamic features through props.
Let’s say that you want an inverted variant of Button above with an inverted background and text. No problem.
Pass the inverted prop to our second button and in Button, you can access all props passed to the component using the ${} syntax with an inner function.
App.jsx
import styled from 'styled-components';

const Button = styled.button`
  background: ${(props) => (props.inverted ? 'limegreen' : 'white')};
  color: ${(props) => (props.inverted ? 'white' : 'limegreen')};
  border: 2px solid limegreen;
  font-size: 1em;
  margin: 1em;
  padding: 0.25em 1em;
  border-radius: 3px;

  &:hover {
    opacity: 0.9;
  }
`;

function App() {
  return (
    <div>
      <Button>Click me</Button>
      <Button inverted>Click me</Button>
    </div>
  );
}

export default App;
In the return of the function, you can select the inverted prop and use a ternary to conditionally determine the color of the background and text.
Here is the result:
Output:

👍 Pros:
- CSS-in-JS is predictable – styles are scoped to individual components
- Since our CSS is now JS, we can export, reuse, and even extend our styles through props
- CSS-in-JS libraries ensure there are no styling conflicts by generating unique class names for your written styles
- No need to focus on naming conventions for your classes, just write styles!
👎 Cons:
- Unlike plain CSS, you will need to install one or more third-party JavaScript libraries, which will add weight to your built project
Conclusion
All these ways of styling react components have pros and cons.
It all boils down to both your own personal preferences and the specific complexity of your application.
We hope this guide gave you a good understanding of how to style your React apps along with which approach to choose for your next project.
As always, ask questions, leave feedback, and keep on coding!✌️
Similar articles you may like
- Using Vite to create a new React app
- React Components – A Theoretical View
- React useReducer Hook – Manage App State Better
- A Complete Beginner’s Guide to React Router


Add comment