
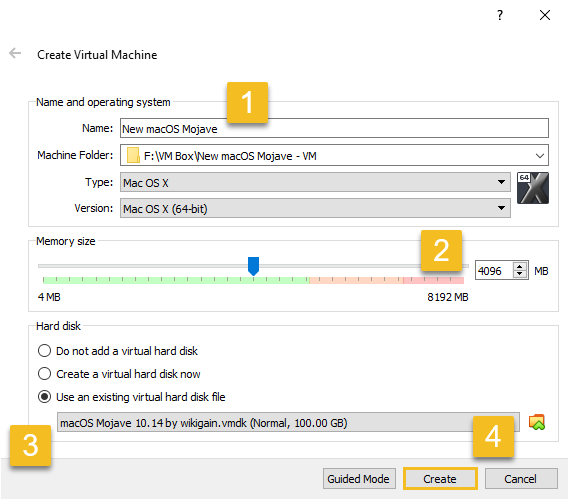
Second, prefer 4GB to 6GB of RAM. And for the Hard Disk >> Select “Use an existing virtual hard disk file”. Choose the downloaded macOS Mojave VMDk file. When you are done, it should look like the following, then click “Create.”
How to customize Virtual machine’s preferences
Well, if you want to work perfectly with macOS Mojave on VirtualBox, then you have to customize some settings. To edit them, open VirtualBox and then follow the below steps as mentioned.
Step 1: Select the created Virtual machine and then click on “Settings”.

Step 2: In the “General Tab”, don’t touch anything and let everything to the default. Go to the next option “System”. You will see three main categories.

Click on the first tab “Motherboard”. Uncheck “Floppy” drive and set the chipset to “ICH9”. The recommended memory size is at least 4 GB or more.
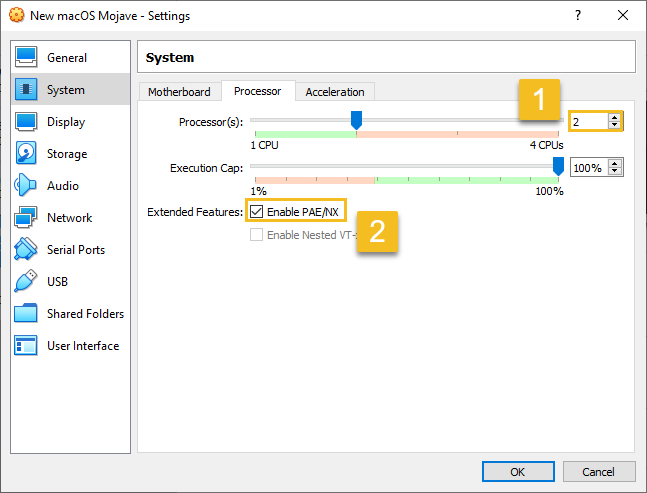
Step 3: In the “Processor Tab”, select 2 processors or more. Don’t forget to tick mark “Enable PAE/NX”.
Step 4: Navigate to “Display” option then put the video memory to 128 MB.

Step 5: Navigate to “USB” section then “Enable USB Controller”. And choose “USB 3.0 (xHCI) Controller”.

Step 6: The last one but not least is enabling the caching feature. To do that, visit the “Storage” tab, on the attributes panel enable “Use Host I/O cache”.

Finally, to save all the changes, click, “OK” button.
Enable Apple services for macOS Mojave with Command prompt and codes
By default, VirtualBox has the ability to support the Apple operating system. But when you are testing macOS Mojave it fails to start the process of installing and using macOS Mojave. That’s the reason for using the codes.
Warning: Before adding the code to CMD (Command prompt) make sure you quit or exit VirtualBox.
Code for Virtual Box 5.x and 6.x:
cd "C:\Program Files\Oracle\VirtualBox\"
VBoxManage.exe modifyvm "Your VM Name" --cpuidset 00000001 000106e5 00100800 0098e3fd bfebfbff
VBoxManage setextradata "Your VM Name" "VBoxInternal/Devices/efi/0/Config/DmiSystemProduct" "iMac11,3"
VBoxManage setextradata "Your VM Name" "VBoxInternal/Devices/efi/0/Config/DmiSystemVersion" "1.0"
VBoxManage setextradata "Your VM Name" "VBoxInternal/Devices/efi/0/Config/DmiBoardProduct" "Iloveapple"
VBoxManage setextradata "Your VM Name" "VBoxInternal/Devices/smc/0/Config/DeviceKey" "ourhardworkbythesewordsguardedpleasedontsteal(c)AppleComputerInc"
VBoxManage setextradata "Your VM Name" "VBoxInternal/Devices/smc/0/Config/GetKeyFromRealSMC" 1
Code for VirtualBox 4.x
cd "C:\Program Files\Oracle\VirtualBox\"
VBoxManage.exe modifyvm "Virtual Machine Name" --cpuidset 00000001 000306a9 04100800 7fbae3ff bfebfbff
VBoxManage setextradata "Virtual Machine Name" "VBoxInternal/Devices/efi/0/Config/DmiSystemProduct" "MacBookPro11,3"
VBoxManage setextradata "Virtual Machine Name" "VBoxInternal/Devices/efi/0/Config/DmiSystemVersion" "1.0"
VBoxManage setextradata "Virtual Machine Name" "VBoxInternal/Devices/efi/0/Config/DmiBoardProduct" "Iloveapple"
VBoxManage setextradata "Virtual Machine Name" "VBoxInternal/Devices/smc/0/Config/DeviceKey" "ourhardworkbythesewordsguardedpleasedontsteal(c)AppleComputerInc"
VBoxManage setextradata "Virtual Machine Name" "VBoxInternal/Devices/smc/0/Config/GetKeyFromRealSMC" 1
We are using VirtualBox 6 for this tutorial, hence we are going to use VirtualBox code for 6.x.
Once you are certain which version of code you should use then follow the steps as mentioned.
Step 1: Replace “Your VM Name” with your virtual machine name that you have created.


Add comment